
How to Install and Configure Shield Security: Step-by-step guide
This step-by-step guide on how to install and configure the Shield Security plugin will enable the standard recommended security settings for your WordPress website quickly and keep it safe from potential threats.

Looking to improve the security of your WordPress website? This step-by-step guide will walk you through how to install the Shield Security security plugin for WordPress. One of the tools to secure your WordPress site from potential threats.
What is Shield Security?
Shield Security is an Intrusion Detection and Prevention security plugin for WordPress that helps secure your website from malicious traffic. It has malicious traffic monitoring capability, Blocks spam bots and content, Disable anonymous REST API access, 2FA support, and many other features designed to keep your website safe and secure.
Key features and benefits
- Automatic IP Blocking: The website owner can check and set the offence count in the settings. After reaching the count, the website will automatically block all malicious traffic
- Site Traffic Monitoring: Continuously monitor all site activity and get security insights into your WordPress website in real time.
- Malware Scanner: The plugin scans your website for known malware and helps keep your website free from viruses.(pro* feature)
- Brute Force and Spam Protection: SecureShield helps protect your website from brute force attacks by rate-limiting attempts and enforcing strong protection.
- Two-Factor Authentication: The plugin also offers two-factor authentication, an extra layer of security for admin user accounts.
You can learn more about the complete features of ShieldSecurity on their website.
Pre-Installation Steps
Before installing the ShieldSecurity WordPress plugin, taking a few pre-installation steps is important to ensure a smooth and safe process.
In this article, we will focus only on the free version of ShieldSecurity.
Backup your WordPress website
It's always a good practice to create a backup of your WordPress website before installing any new plugins. This ensures that you can restore your website to its previous state in case anything goes wrong during installation.
Update WordPress and all plugins
Ensure your WordPress core installation and all other plugins are up to date. Running the latest versions of WordPress and plugins helps ensure compatibility and security.
Installing ShieldSecurity
Log into your WordPress admin account, navigate to "Plugins" -> "Add Plugins", and search for "Shield Security".
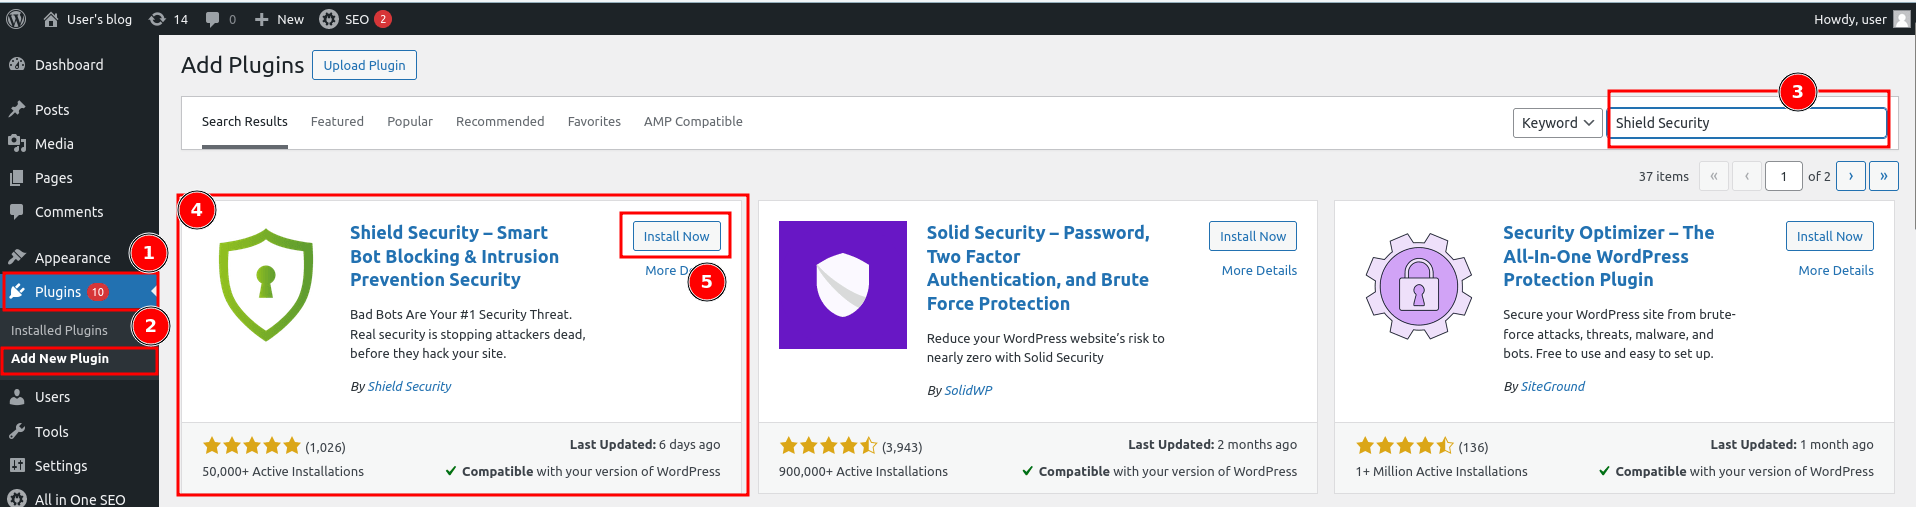
Once you find the "Shield Security" plugin, click the "Install Now" button.
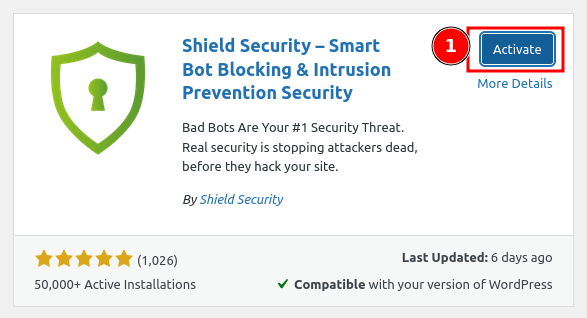
After installation, click the "Activate" button to enable the plugin.
Activate Shield Security
A plugin configuration wizard is loaded, which will quickly help you navigate and set up the required features.
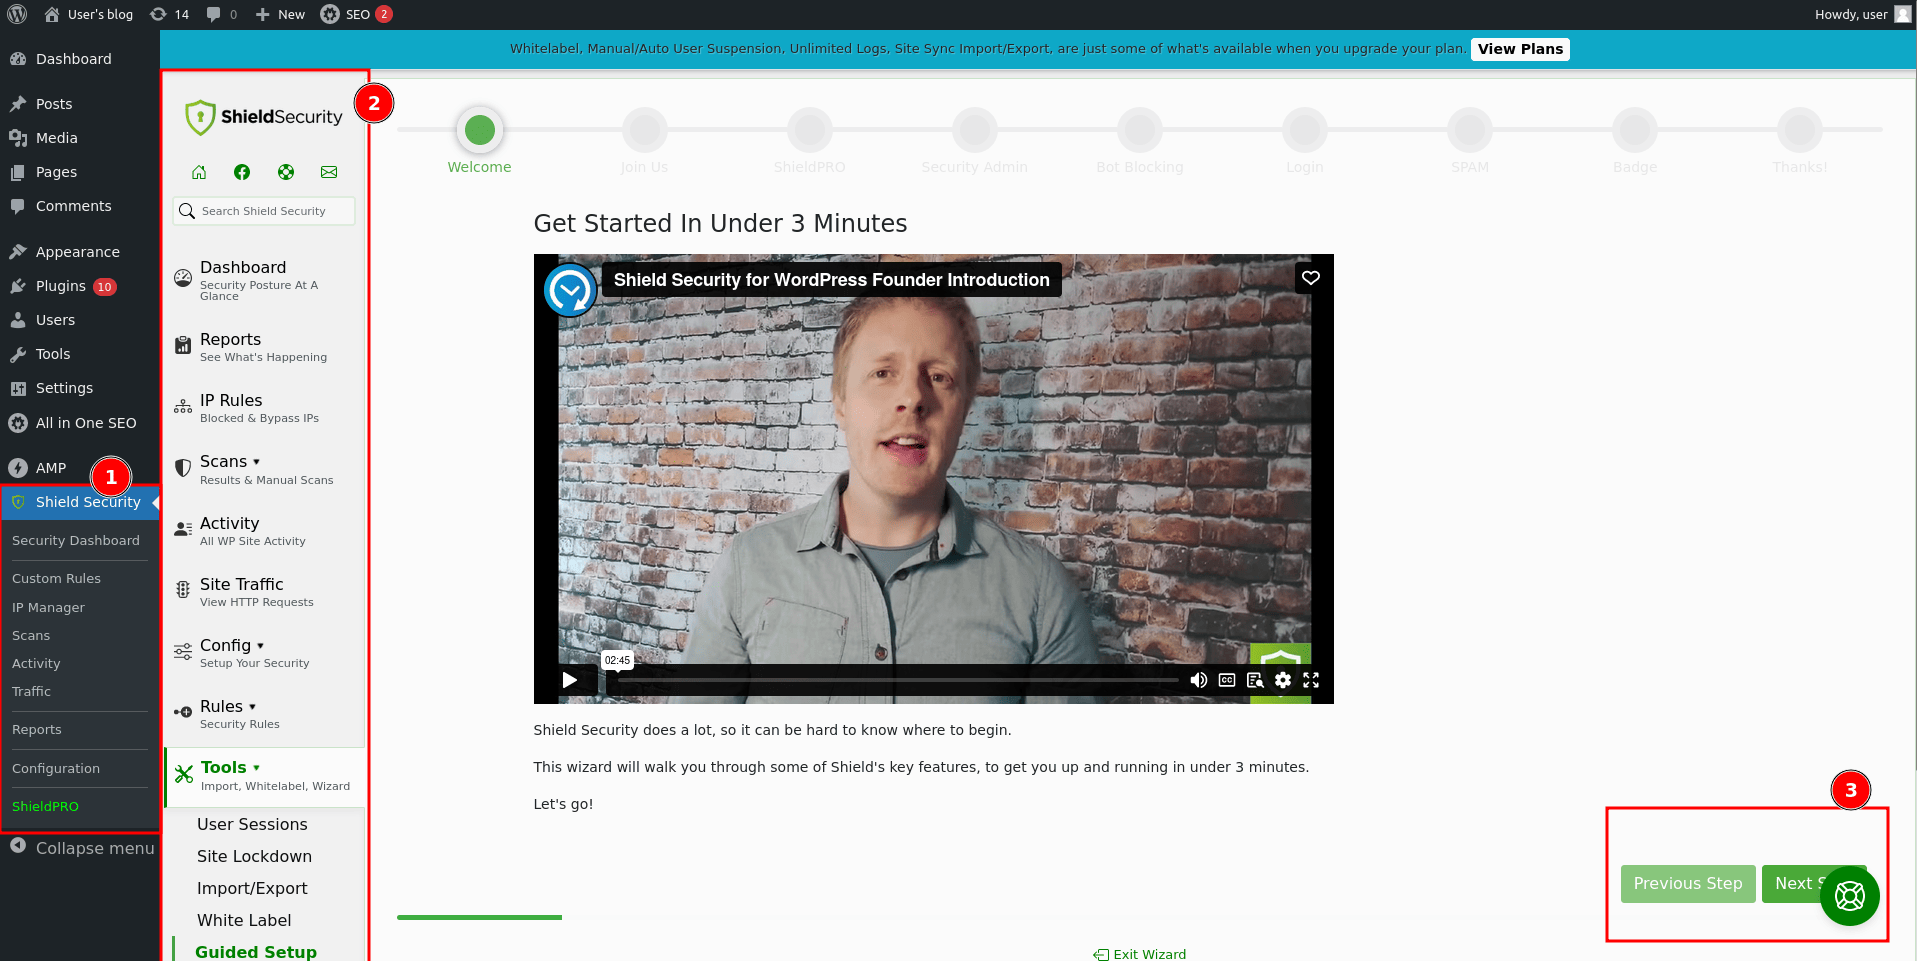
- A Shield Security menu will be displayed. Using the WordPress dashboard, you can Navigate to the Shield Security Plugin.
- A Dedicated menu to manage all "Shield Security" plugin features.
- Click on the "Next Step" to go ahead and quickly enable the security features needed.
Subscribing to Newsletter
The first step involves subscribing to a newsletter. You can sign up or click on "Next Step."
Activate License:

The next step prompts activating the "ShieldPRO" license. As this article only focuses on the free version, I will skip it and click "Next Step."
Setting up Shield Admin PIN
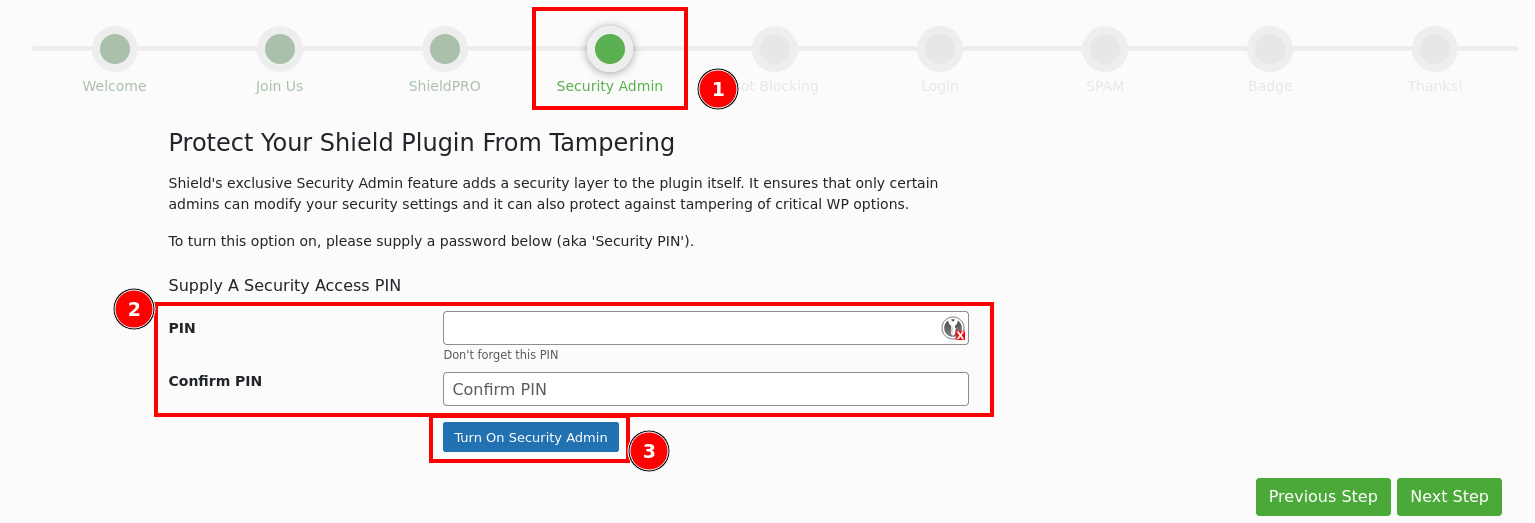
The application displays the form to set up a plugin PIN in the "Security Admin" section. This would be an added layer of protection for admins, ensuring only the authorized person can access or modify the security setting.
Key in the PIN, Confirm the PIN, and click on "Turn On Security Admin." A message stating that the PIN has been successfully set will be displayed, and you will be taken to Bot Settings.
Bot Blocking
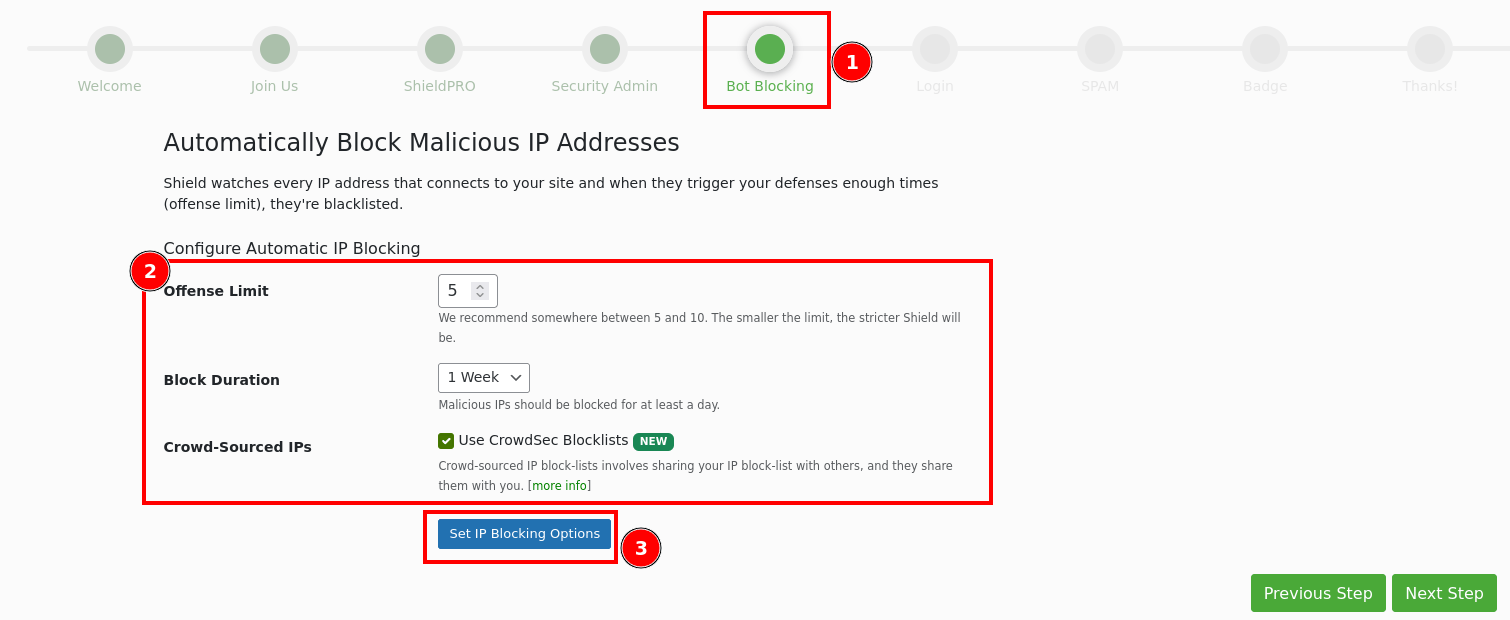
The next setting is about how to handle the Bots and Malicious traffic. Identifying the malicious traffic patterns and bad bot behaviour ruleset is already taken care of by the plugin vendor.
As a website owner, based on your site traffic and user patterns, decide after how many offences you would like to block the IP. The default offence limit is 10. I have set the offence limit to 5 for strict security and the Block duration to 1 week.
To activate it, click on "Set IP Blocking Options". After 5 malicious attempts, the IP address will be blocked for 1 Week.
The Whitelist option is also available, where admins' and security researchers' IPs can be whitelisted as needed.
The option "Use CrowdSec Blocklists" is also an added benefit.
If an attacker's IP is flagged on your site for offences, it is shared with CrowdSec, and similarly, other websites' flagged IP addresses are shared with your site. This helps to block malicious attempts at early stages proactively.
Brute Force Login Protection
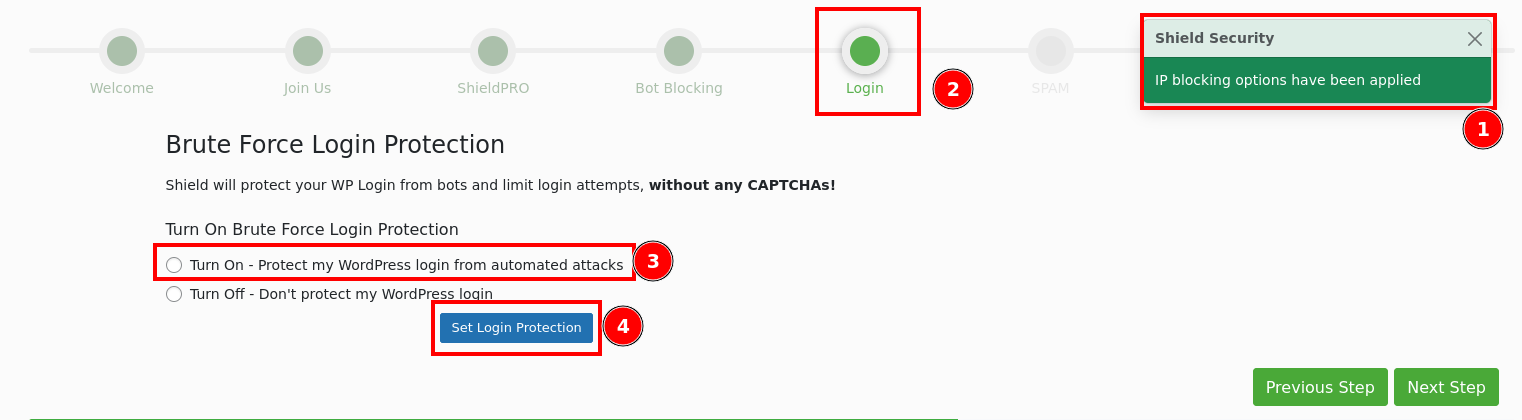
One of the most common attacks on a WordPress website is the automated Brute Force attack. The attacker tries to find the valid credentials that match a known user name or by blindly trying with a huge list of usernames and passwords. This happens continuously each and every day.
Shield Security Brute Force Login Protection will detect automated attacks and block them from exploitation.
Make sure to "Turn On - Protect my WordPress login from automated attacks", click on "Set Login Protection".
Block Spam Comments

Spam comments are another common problem among WordPress sites. The free version also covers this.
Please check on "Turn On - Block automated SPAM comments" and click on "Set Comment SPAM Protection" to enable.
Click "Go to Shield Overview" on the final thank you page.
Shield Security Dashboard
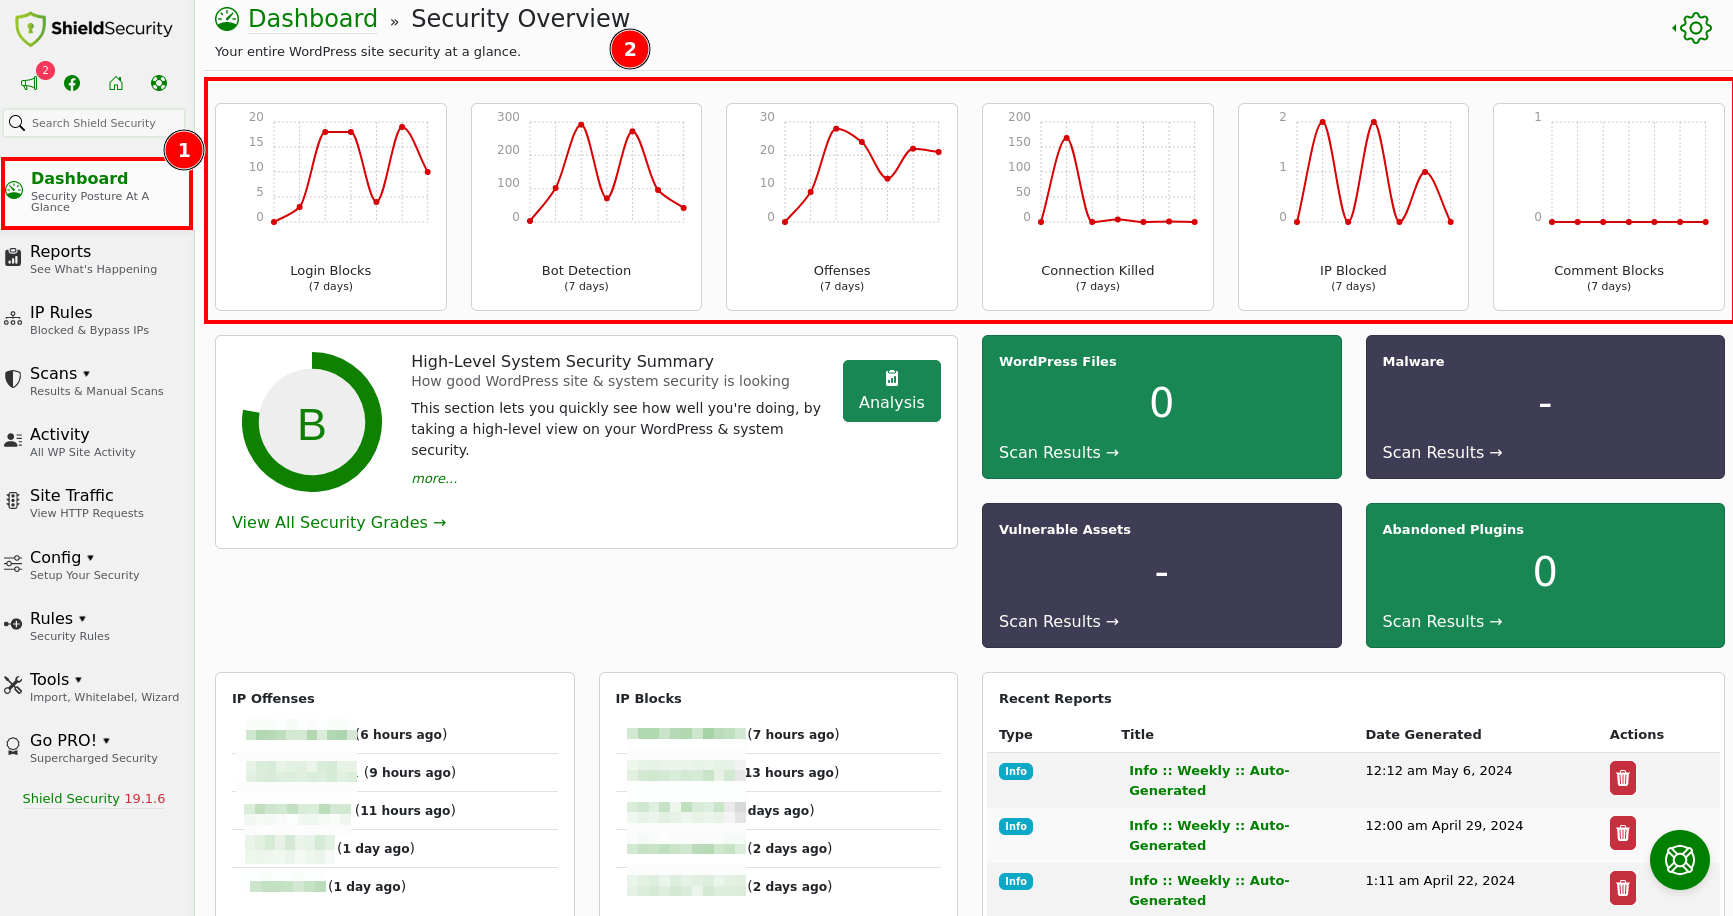
The "Security Overview" dashboard is a place where you can see all the info about security happenings on your site.
The top graph displays total number of Login Blocks, Bot Detection, Offenses, Connection Killed, IP Blocked etc in past 7 days. Additionally the security summary of our website.
One of the major reason I found to useful about this plugin compared to WordFence is for real-time threat protection and less memory usage compared to it.
Enable Auto Updates
Just make sure to enable the "auto-updates" for Shield Security plugin, so you don't need to update every time manually. I have been using it for more than couple of years and haven't see any breakages so far.
I hope the above information helps secure your site. The above configuration can quickly help to secure your WordPress site from good number of attacks. In future articles will be posting about the detailed hardening steps using Shield Security plugin soon.
Shield Security Help
Check out the Wordfence site for more help information.

Conclusion
Securing the WordPress website is an important factor for website owners. With the increasing attacks on WordPress, proactive measures like this help secure your online assets.
Secure Shield is a free, real-time WordPress security plugin that enhances your website's security. It provides many features, such as blocking malicious comments, bots, attackers, firewall protection, and Two-Factor Authentication.
Don't wait until it's too late; enable it now to reduce security attacks.