
Enhancing the Security of WordPress Sites: Best Practices and Tips
Discover the essential tips and best practices for enhancing the Security of WordPress Sites. Owners can analyze security risks, install recommended plugins, monitor continuously, and tweak configurations, which can help keep your sites safe from potential threats.

Discover the essential tips and best practices for enhancing the Security of WordPress Sites. Owners can analyze security risks, install recommended plugins, monitor continuously, and tweak configurations, which can help keep your sites safe from potential threats.
The major focus of this article is to provide detailed and step-by-step instructions to help website owners take action with easy-to-follow steps. Even non-technical users would also be able to follow along and secure your WordPress sites.
Understanding the Importance of WordPress Security
It is reasonable for users to think that WordPress's security must be taken care of by the provider itself. Let's understand how the WordPress ecosystem works.
About WordPress Software
WordPress is a dynamic open-source content management system that is freely available to anyone who wants to set up a publishing website.
The WordPress core is continuously hardened with all the vulnerabilities that have been identified and reported as part of OWASP Top 10. Also, the recommended security best practices are provided for authors developing third-party plugins and themes.
The WordPress Team's responsibility covers identifying and resolving the security issues in the core software provided. It's a community project that is used across 10 million websites on the internet. Any programmer can create a third-party plugin or theme based on their needs.
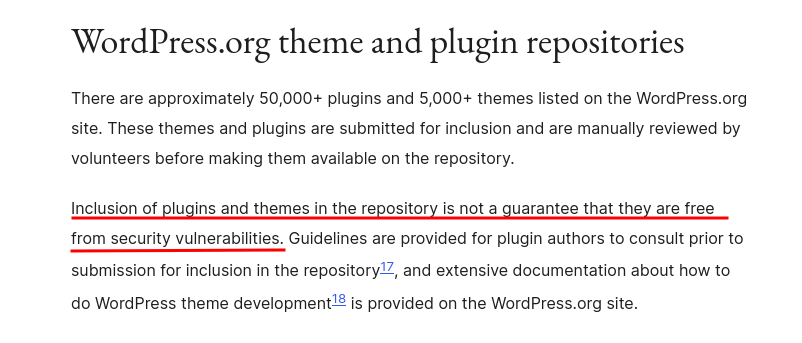
From above, even after providing the secure guidelines and getting the code reviewed by volunteers, sometimes the security bugs can be missed, or new bugs found need to be updated accordingly.
To proactively mitigate security vulnerabilities before attackers find them, the WordPress Security team even runs the Bug Bounty program at HackerOne as an additional measure to report any security vulnerabilities identified by security researchers and make the platform more secure.
WordPress security teams even go beyond to remove the vulnerable plugin from the directory if the plugin owner doesn't fix or fix it themself in extreme cases.
Third-party plugins and themes are reviewed for security to a certain extent. In addition to WordPress software, the security of the underlying operating system used, configurations, database servers, secure file transfers, TLS security, and web servers are also equally important.
The WordPress team is actively working on mitigating security defects in WordPress Core, Plugins, and Themes. However, the security of all underlying technologies and ensuring all the updates are patched falls under the Owner's responsibility.
If your hosting provider takes care of your underlying tech stack, it is your responsibility to ensure the core, themes, and plugins are updated and downloaded from recommended websites.
About Managed WordPress
When you come to Managed WordPress (i.e., wordpress.com), You just need to register, pay according to your package preference, and start publishing right away.
Managed WordPress uses the same WordPress Core Software. The underlying technology, like setting up software and managing the web server and other resources, is completely handled by the Automattic team.
Authors need to focus only on creating content for their niche.
The Vital Need for Security
Based on the above choices, the security requirements do vary. A managed service is the best option for most website owners and companies. However, there are cases where the website owners require more customizability or manage multiple websites. In those cases, the users prefer the self-hosted version of WordPress.
Going forward, we will focus only on the security needs of self-hosted WordPress websites. We will set up a WordPress site and start securing it step by step.
Cybercriminals are constantly looking for new ways to exploit vulnerabilities and compromise website security. Any security weakness on site can be an opportunity for attackers. As a WordPress website owner, securing the business and customer data hosted on your website is the most crucial.
Sucuri ranked WordPress as the most infected CMS website in 2022 by Sucuri. Below are statistics on vulnerabilities based on WordPress components by wpscan.
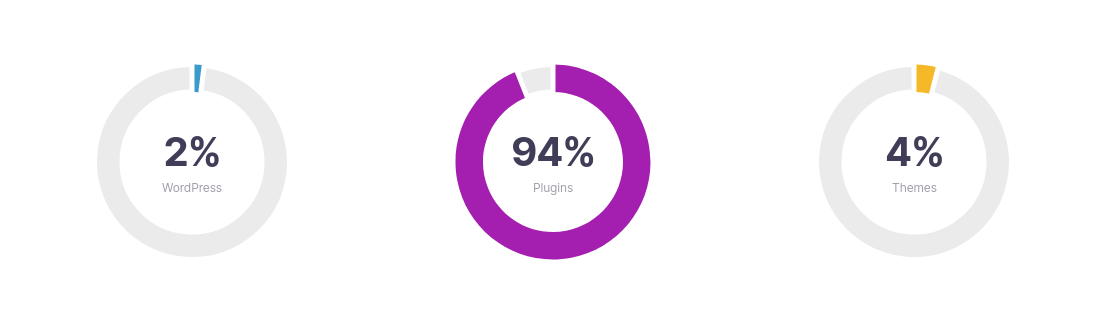
Most of the vulnerabilities were found in third-party plugins, and a few of them are in the themes. Attackers leverage these vulnerabilities to gain unauthorized access to your website, spread malware, steal sensitive information, or even disrupt the functionality of your site. As a result, proactive efforts can help you to secure your website.
Check the post below to learn more about how to scan for WordPress vulnerabilities.
 Raghunath G
Both technical and non-technical users can follow the content covered in this article.
If, by any chance, you are using another third-party vendor to manage "WordPress" for you? check out their support page to understand what is covered in terms of security and what needs to be taken care of by yourself.
Backup your WordPress site
Before making any changes to your website, the first thing to do is to ensure that a complete website backup is taken and can be easily restored at any time. This precautionary measure will be helpful in case any unexpected issues arise. Therefore, data integrity should never be compromised.
It would be a disaster if you lost the backup copy and all the site contents were tampered with or completely lost in any security attack.
Having Scheduled Backup
On-demand backups are a good thing to have. However, having a scheduled backup is still crucial for a website.
Taking backups at regular intervals can help you restore in case of a security incident or from human mistakes. You can set the frequency based on how much new data is being added to your site.
You can adjust the backup intervals from minutes to days based on the criticality of the data. This is one of the important things to check while choosing a hosting provider.
Below is one of the good articles you can check about how to back up your WordPress site.
 Syed Balkhi
Keeping WordPress core, Themes, and Plugins updated
One of the most essential steps is to keep your site updated with the latest version of WordPress core, theme, and plugins being used.
Outdated plugins can always pose security risks. From the above stats, we can understand that 94% of the attacks originated from third-party plugins. Keeping the site updated can help you to prevent a lot of attacks. This simple step can mitigate a lot of attacks for you.
Log into your WordPress site using an admin account and navigate to the "Dashboard" - "Updates".
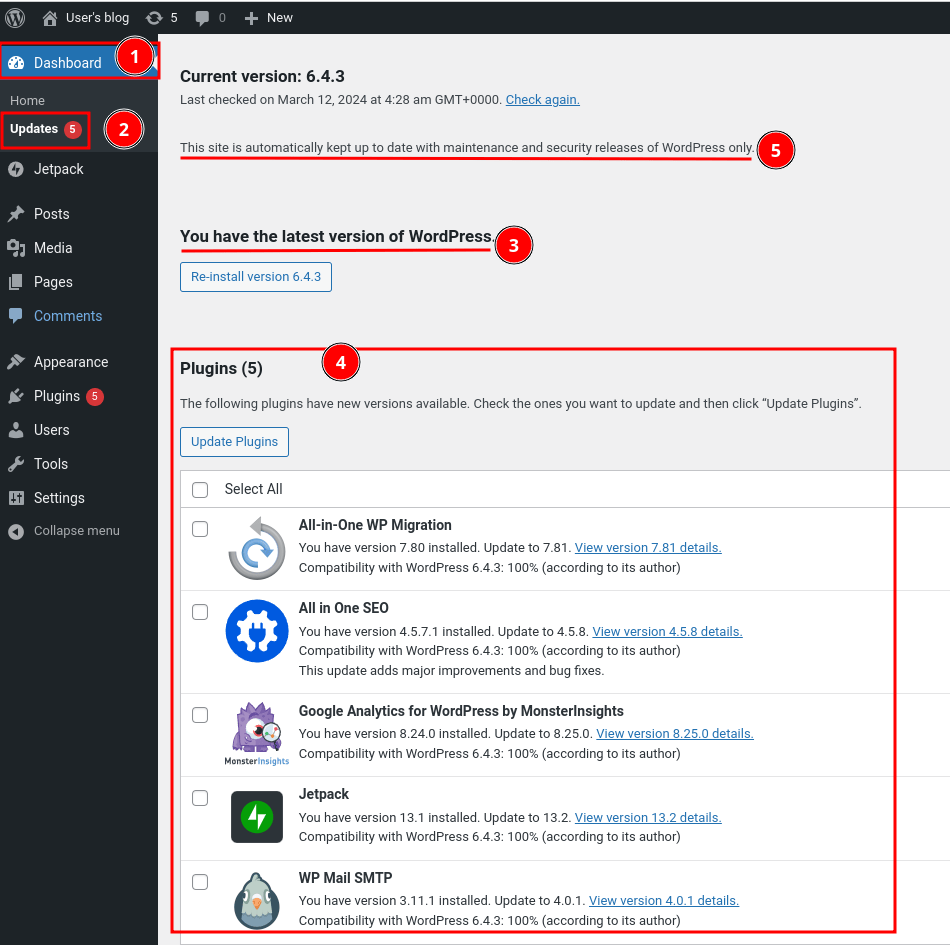
On your updates dashboard, you should be able to see information about which things require updates.
- Currently, our WordPress Core is already updated, and the latest version is present on the server, i.e., Version 6.4.3.
- The 5 Plugins installed on the above server require updating. The updates can be for many reasons, like new feature releases or bug fixes. You can always click on the "View version x.x.x details" link, which will take you to the Changelog, where a detailed list of what has been changed and what has been improved.
- WordPress Core is Automatically updated with security releases.
An Admin can see all the available updates.
You can easily update all the necessary plugins.
1. Ensure all your Custom Coded application functionality is free from conflicts.
2. Verify all Plugins, Themes, and Core are compatible with the versions and tech stack you are using.
Enable auto-updates for WordPress Plugins and Themes
Navigate to the "Plugins" section in the dashboard, which will be displayed below.
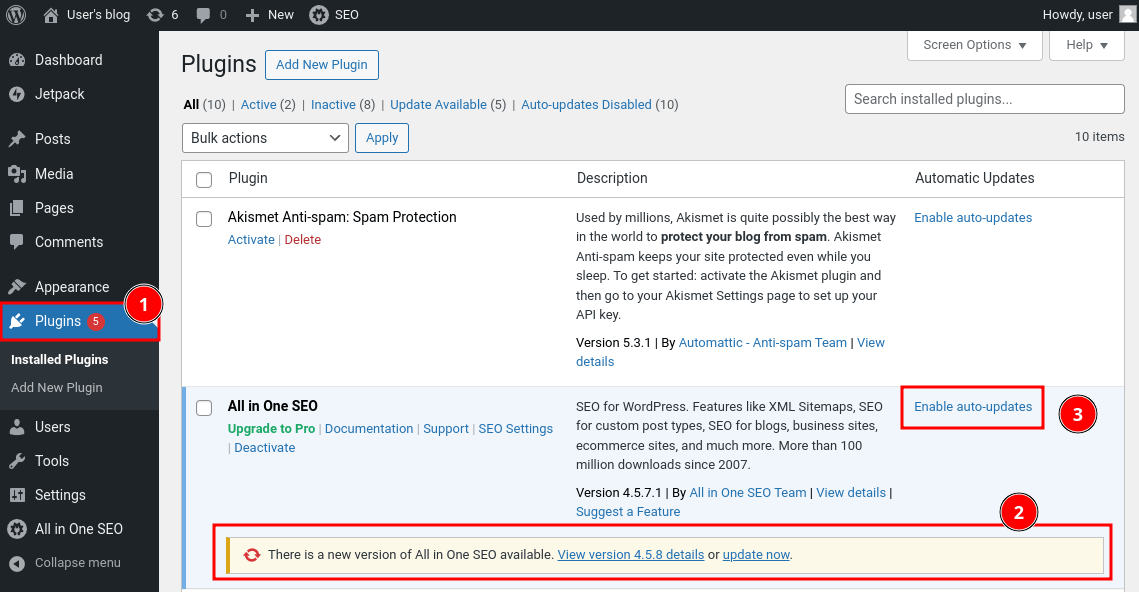
The "Plugins" page is where you can manage all your plugins and update them all at once.
For any plugins that you think are not very impactful to your website, you can click on the "Enable auto-updates" button. It will check for the latest updates available daily. If yes, it will automatically update for you.
The above option is very helpful.
Default themes provided by WordPress are rigorously tested for security vulnerabilities along with the core.
Similarly, navigate to "Appearance" -> "Theme," select the theme, and click on "Theme Details" for the one that you are using.
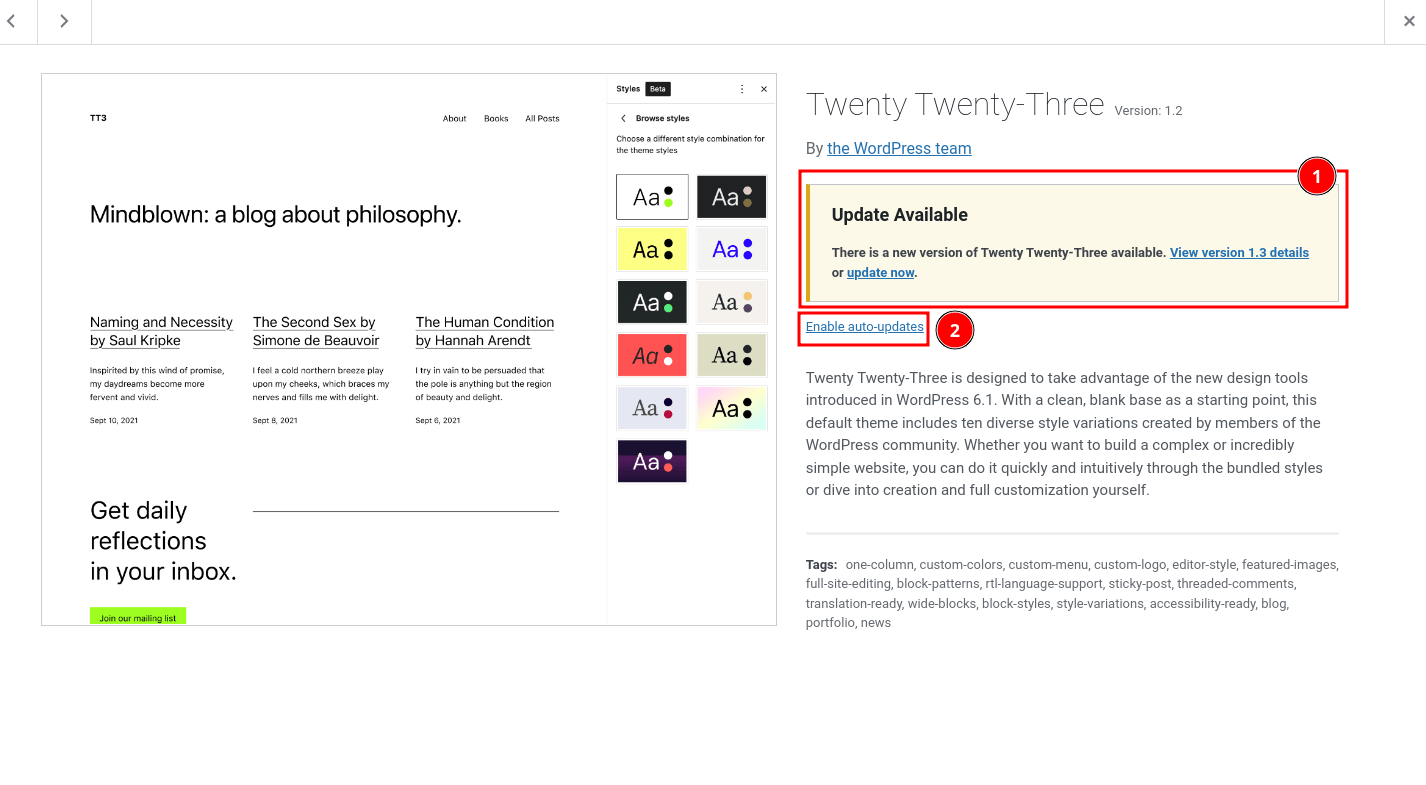
You can manually update or just click on the "Enable auto-updates" link. I hope you're just using the default team directly provided by the vendor without any customization.
Deactivate Unnecessary or Unused Plugins came default
When we spin up a self-hosted WordPress website, we usually use prebuilt templates provided by the cloud providers or the hosting providers. In any of those cases, WordPress does come with some pre-installed plugins, but some of them might not be useful in most cases. You can just deactivate those plugins or delete them completely if they are not of much help.
Navigate to the "Plugins" section in the dashboard, select the "Active" plugins list, and click on the "Deactivate" link for all the plugins that are not very useful to you.
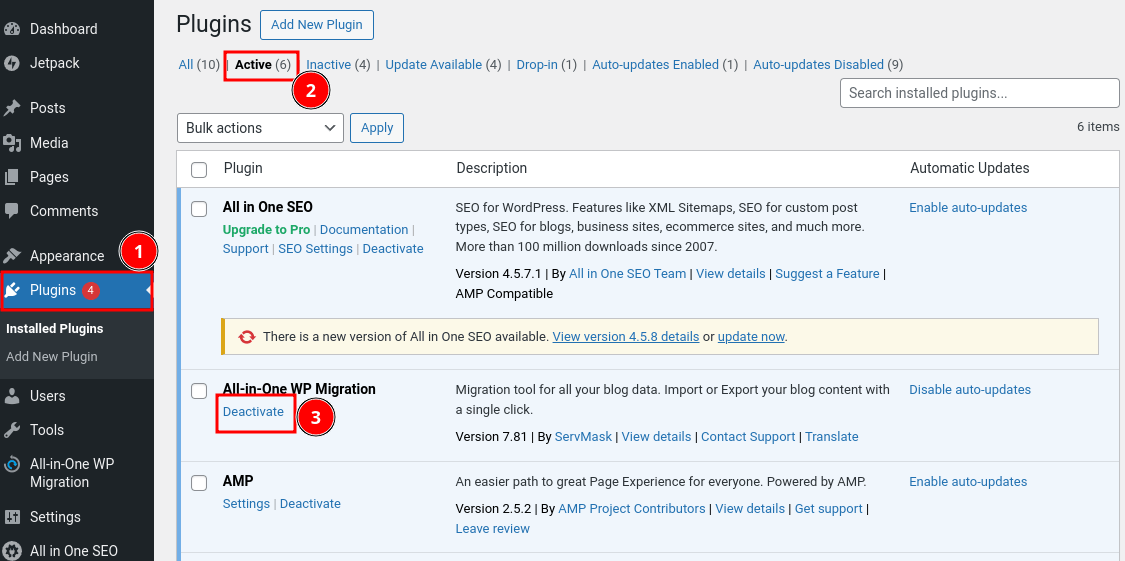
Even after the plugin is deactivated, the code is still present and using your storage place on the disk. The database entries will be there.
If the plugin does not have any important data, you can go ahead and delete it. It will delete all the files and data related to it from the database as well.
If you think the plugin is no longer needed, You can go ahead and delete it completely. Click on the "Inactive" filter from the "Plugins" dashboard and click "Delete".
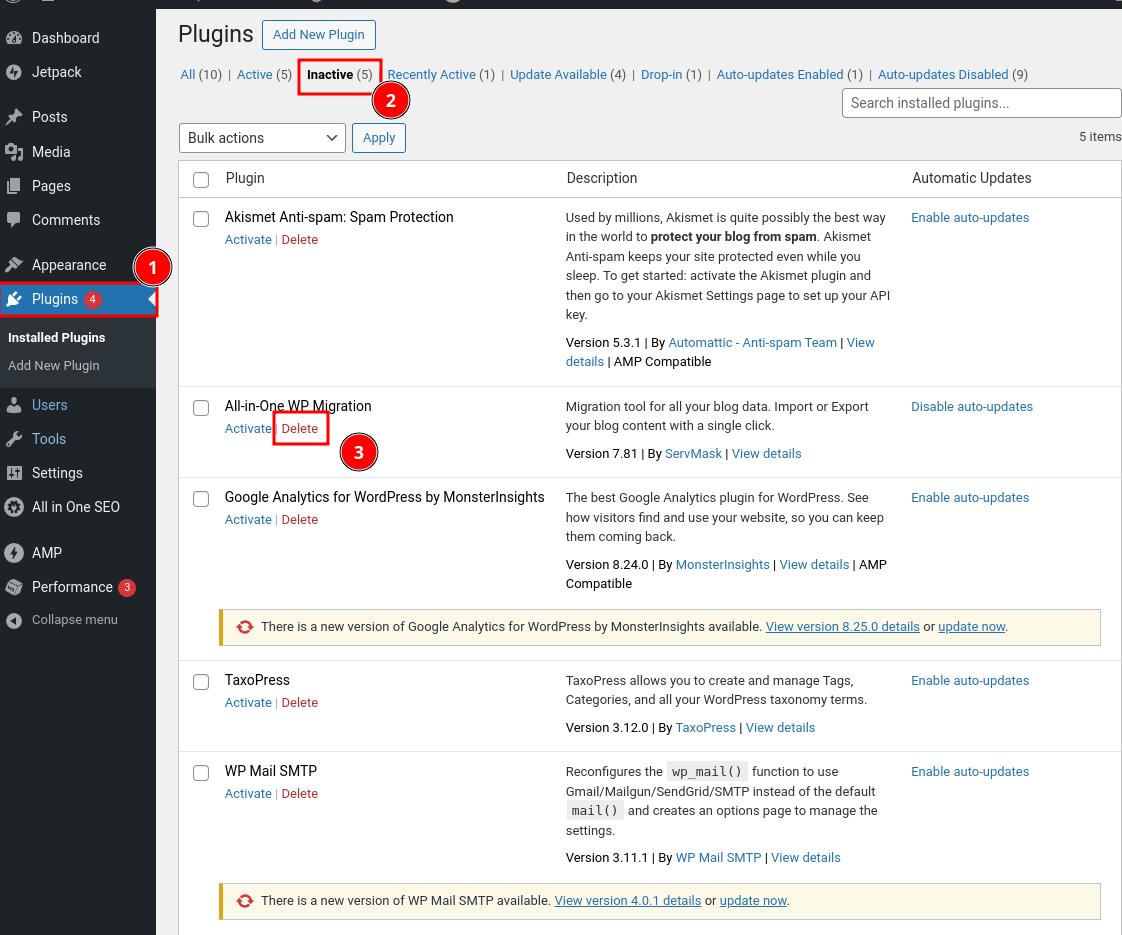
The above step is one of the ways in which you can reduce the attack surface for your website. Not only that, but this step can also increase the performance of your website.
Delete Unused Themes came by default
You can keep the unused theme if you are using it for testing or for other purposes. But I believe there is no point in maintaining a feature that we don't use.
Navigate to "Appearance" -> "Theme," select the theme, and click on "Theme Details" for the one that you are using.
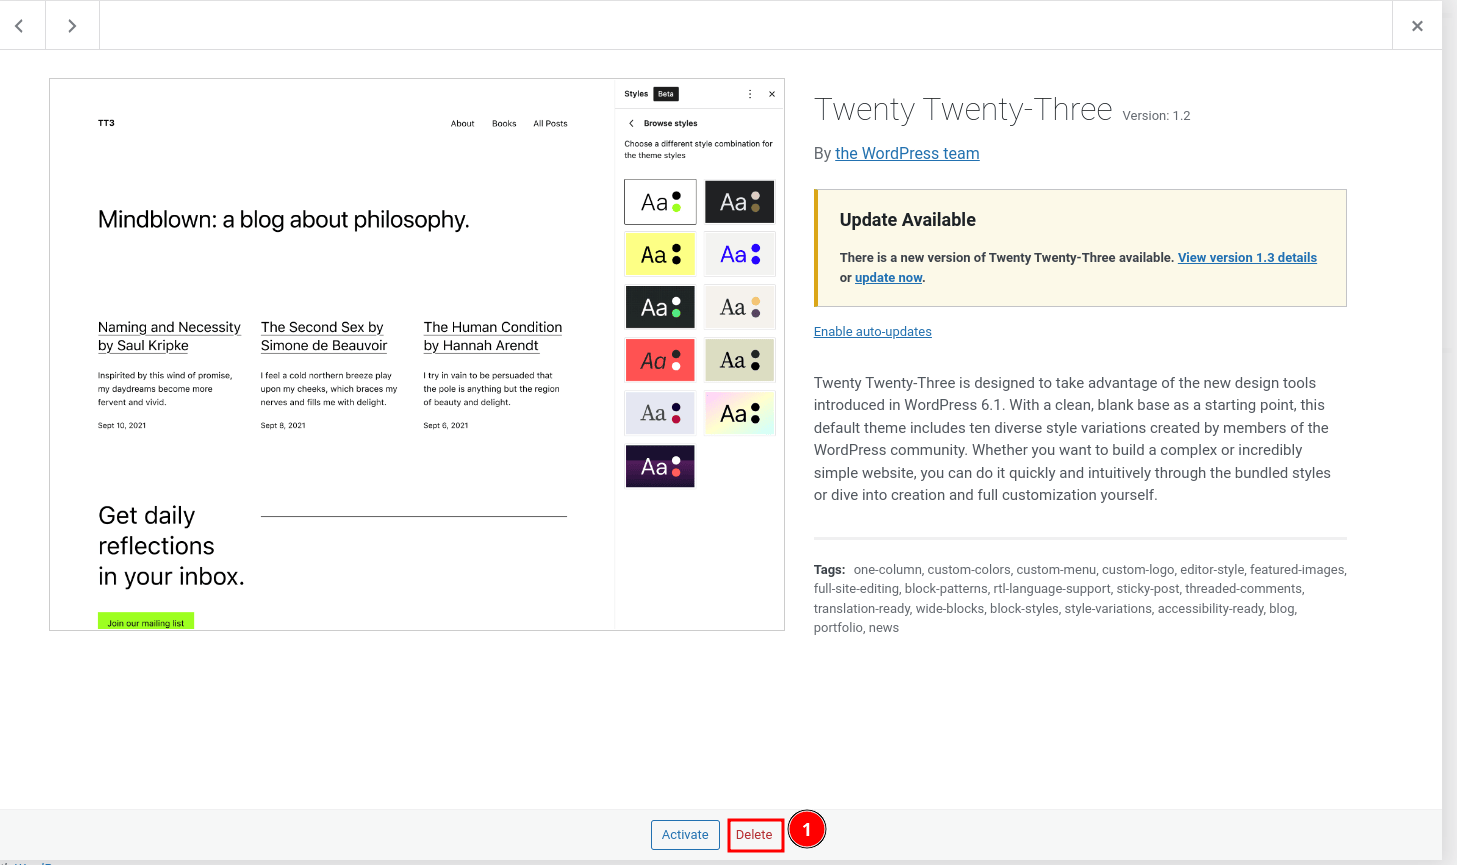
At the bottom of the Theme Details, you can just click on the "Delete" button.
Qualities to Check with Your Hosting Provider
- The vendor provides the most recent stable version of WordPress Core and the latest version of all underlying tech stack.
- Providing reliable methods for backup and recovery of your data as and when needed.
- Ensuring secure communication between the Client and the Server. (Ex: TLS)
- Transparency in communications in case of any security incidents.
- Ensuring your site availability.
- Ability to discuss any of your security concerns with the support team.
Use HTTPS Secure Communication Protocol
Ensure your WordPress website is enabled with Transport Layer Security (TLS), i.e., HTTPS enabled. Older versions are referred to as SSL.
- HTTPS runs on port 443 by default. (You can change it to any port.)
- HTTP runs on port 80 by default.
One of the major drawbacks of the HTTP protocol is that anyone on your network can view and monitor all your activity, including sensitive information like usernames, passwords, etc.
HTTPS prevents attackers from viewing or tampering with Client-Server communication. It transmits and receives all your communications through a secure channel.
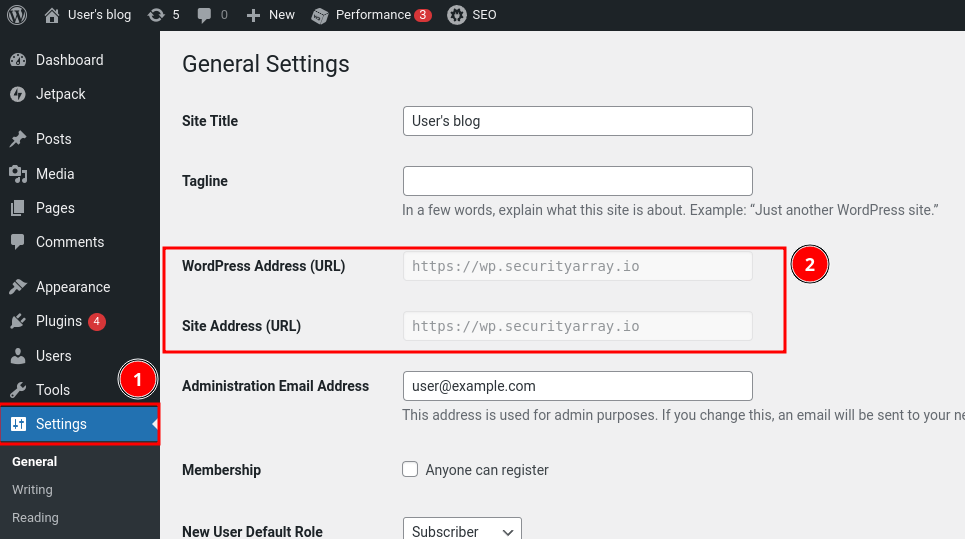
Ensure HTTPS is enabled and that your site only listens to HTTPS communications. To verify, navigate to the WordPress Dashboard --> Settings --> General.
Check that the WordPress Address (URL) and Site Address (URL) are set with the https prefix as displayed below.
If you are unable to update it from the portal, you might need to change it accordingly in the wp-config.php configuration file.
Additionally, you can go ahead and add a rule in the firewall to disable all communications on HTTP port 80 and redirect all traffic to HTTPS port 443.
Let's verify our site is accessible over HTTPS and has a valid certificate.
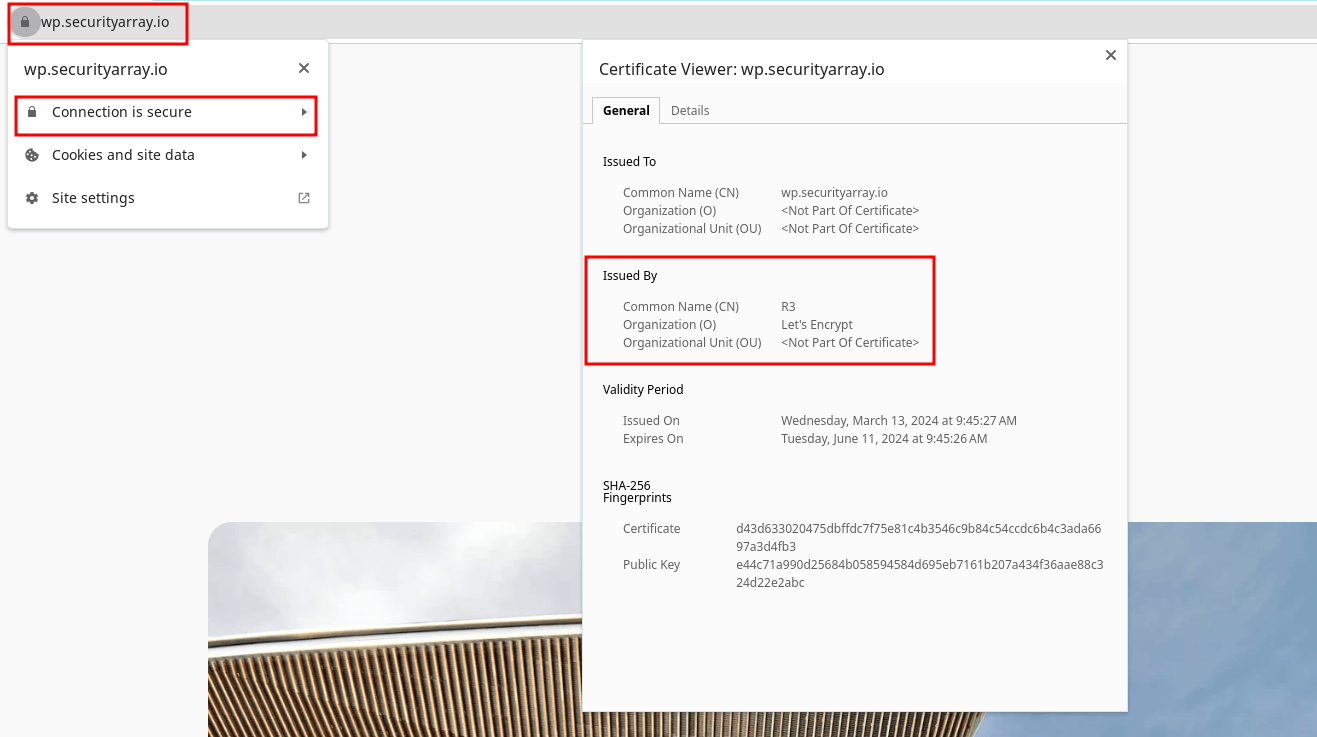
Sometimes, the vendor might already have enabled it or provided you with the necessary information to do so. Refer to your vendor documentation for instructions on how to do so.
Using WordPress Security Plugins
The built-in options for securing the WordPress site are limited. This is where third-party plugins and SASE-based firewalls come to our rescue. In this section, I will focus only on one WordPress security plugin, which contains more options available and is freely available.
I will use Wordfence for the examples below. There is no silver bullet in security. You are free to explore other alternative plugins, both free and paid, listed below.
Pick one that aligns closely with your requirements. Remember, Trust and reliability are the most important factors when choosing a security plugin. Check out their reviews and support information, too.
Why did I choose Wordfence?
- A good number of security hardening features are available for free, which can help you quickly start securing your website.
- Offers malware scanning for free.
- It continuously updates the vulnerabilities database.
Wordfence Installation
I have already created a post on installing Wordfence. Check out the bookmark below to install the Wordfence WordPress security plugin.
Raghunath G
Continue to the next section if you have already installed it.
Admin Login: Enable Two-Factor Authentication
The first step is to secure the WordPress site's logging-in mechanism. This will ensure only authorized users are logged into the portal and deny all others by default.
This is not limited to the admin user account. It can be enabled for all the user accounts and roles that are critical for your business operations.
To get started, Log into the WordPress admin dashboard.
- On the left side of the WordPress admin menu, click on "Wordfence".
- Navigate to "Login Security".
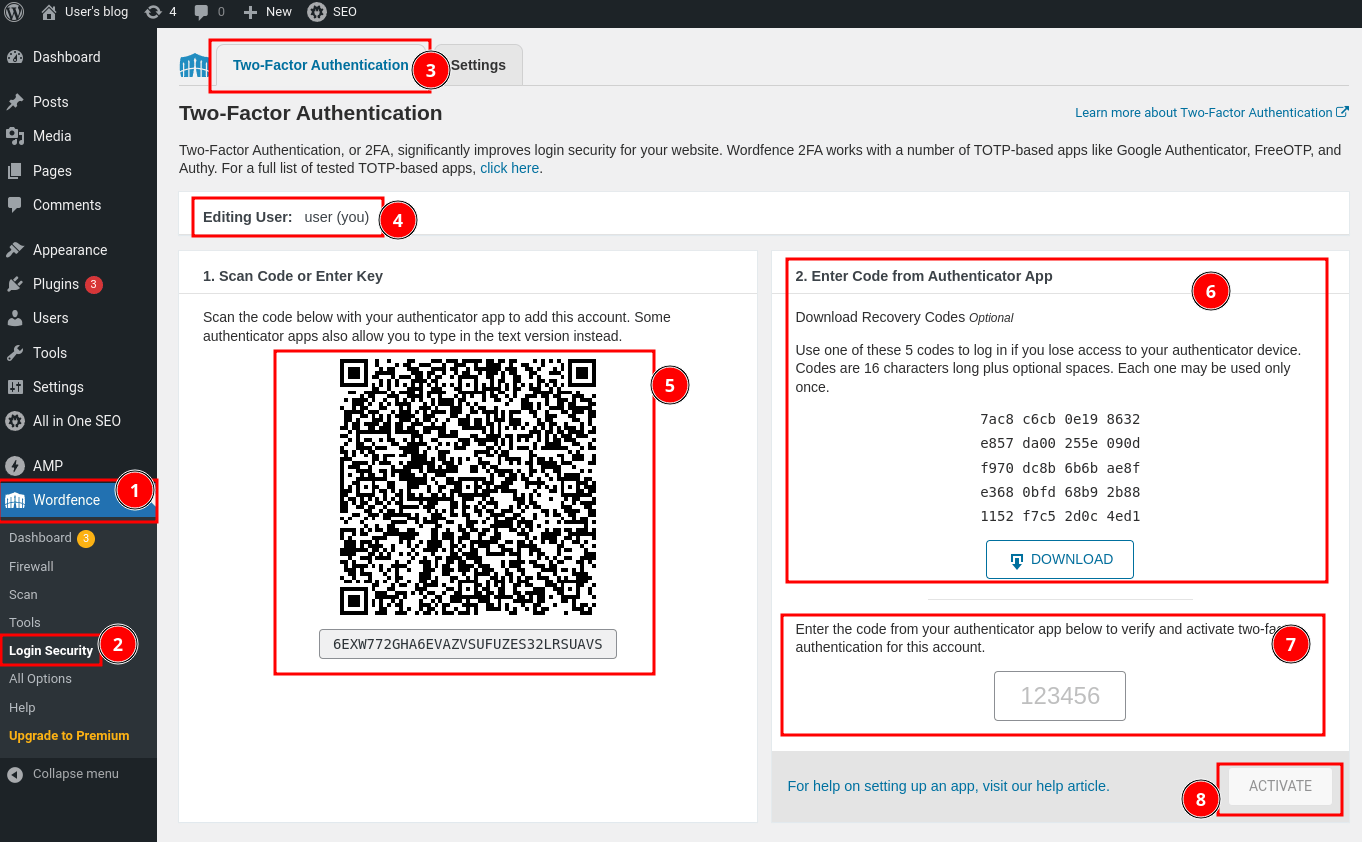
- Wordfence "Two-Factor Authentication (2FA)" screen will be loaded with instructions for setting up the 2FA.
The 2FA provided here is based on a mobile application. You can register with any of the Time-based One-time Password (TOTP) apps, such as Google Authenticator, FreeOTP, AuthyEnter the TOTP code displayed on your Mobile app and verify if it's reflecting correctly and syncing properly with the server., etc. Full list of supported apps can be referred here.
- In the above screenshot, "user" is my admin account, and I will enable 2FA for it.
- Using any one of the TOTP-based apps, scan the code and ensure the entry is added to your 2FA app.
- After adding an entry, download and save the Recovery Codes in a safe location, which can be used when the TOTP code is unavailable.
- Enter the TOTP code displayed on your mobile app to verify that it's reflecting correctly and syncing properly with the server.
- Click on the "Activate" button to ensure your 2FA is added successfully.
I hope you have saved your recovery codes safely. After adding 2FA to your admin account, the next screen will be displayed about your 2FA status.
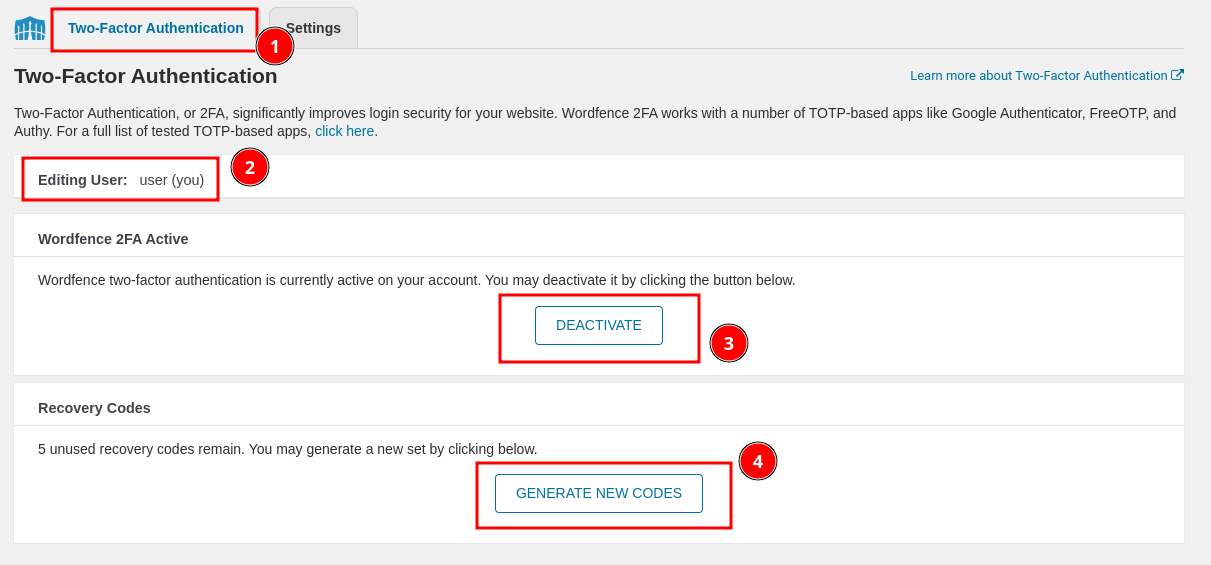
- Displays information about the Two-Factor Authentication.
- 2FA status of the currently logged-in user. (i.e., user).
- Option to deactivate.
- If your recovery codes are compromised or lost, or if you used all the previous codes, you can generate a new set of recovery codes by clicking on "Generate New Codes".
Verifying Two-Factor Authentication
Let's go ahead and verify the 2FA which we have newly created. Launch a new incognito window and visit your WordPress admin login page.
A login window appears, the same as how you used to log in earlier. Just enter the valid admin username and password. Immediately, you will be taken to a 2FA authentication page.
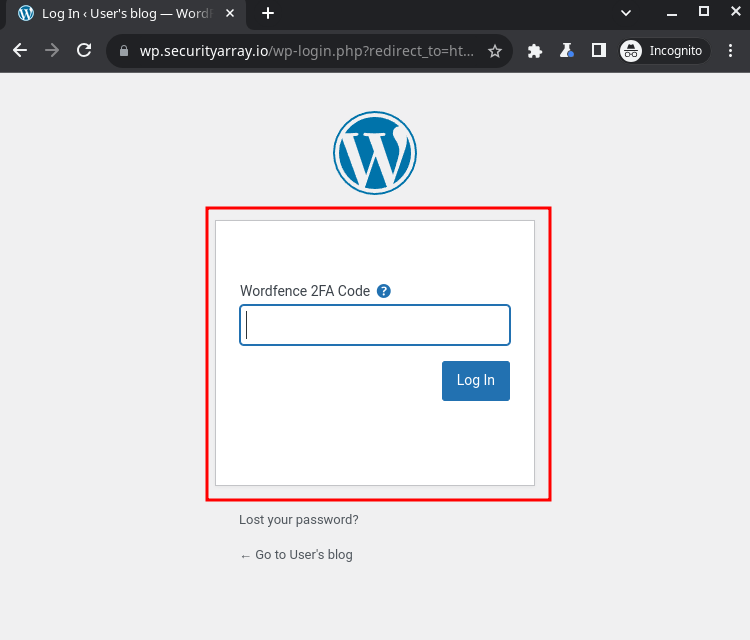
Enter the code from your mobile app for the wordfence and ensure everything works successfully. This will confirm that you have successfully set up your 2FA authentication for your admin account.
Updating 2FA Settings
- In the WordPress dashboard, visit "Wordfence" -> "Login Security" and click on the "Settings" tab.

- You can view the summary of user accounts and update the 2FA policy for your WordPress Portal. I have chosen all the admin accounts that must have 2FA enabled and are optional for other users.
Enable 2FA for WooCommerce
If you are using WooCommerce, ensure that the 2FA support is extended to WooCommerce users as well.

Enable reCaptcha
In the Wordfence "Login Security" settings, you can even find the option to enable "reCaptcha", which verifies it is a human who is trying to log in or register before submitting.
This will help you in defending from brute-force attacks.
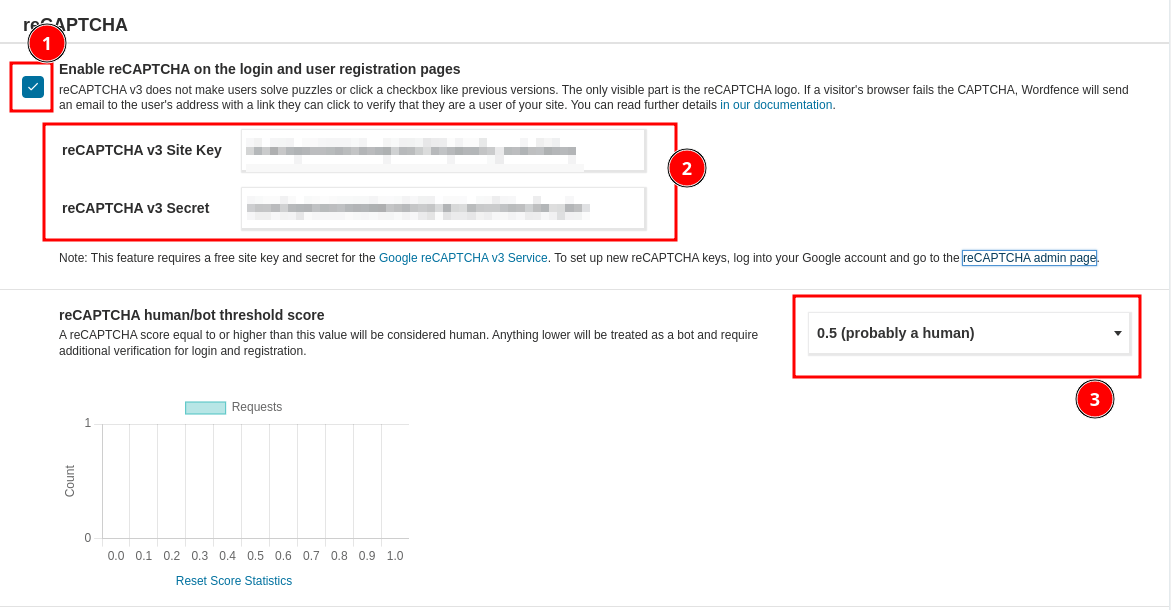
- Ensure reCaptcha is checked, and make sure to update the Site Key and secret provided from your Google account after registering. You can register for reCaptcha by logging in with your Google account here.
- This is a threshold, which is like how strictly you want to check whether it's a human or a bot. It's good to start with the default. 1.0 is considered stricter, and 0.0 is the least strict.
Verify reCaptcha
Once Google reCaptcha is enabled, you will see the captcha icon at the bottom of the WordPress admin login page and user registration page.
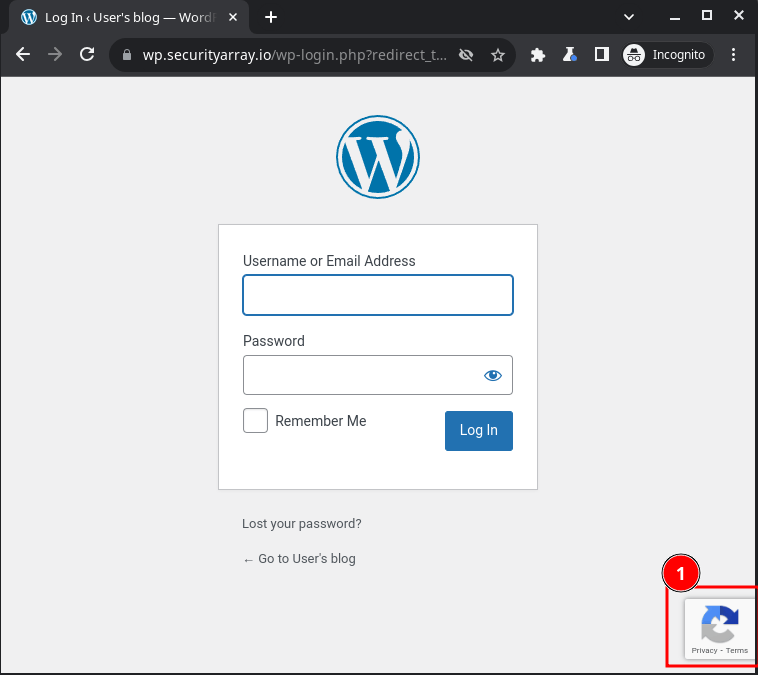
From now on, it will verify and ensure that only humans can fill out and submit the forms on your website.
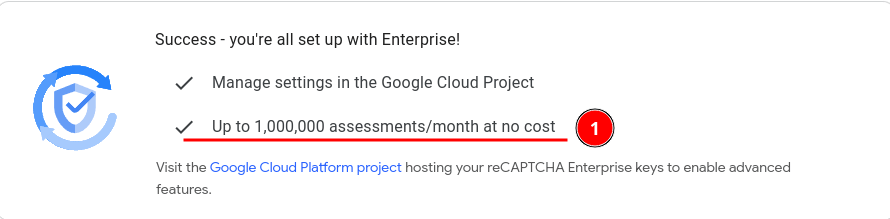
💲 Remember, google reCaptcha has a limit on the number of free assessments that can be done. Beyond the limit, it will be charged monthly.
Using the above settings, you can prevent the brute-force attacks on your website.
Strengthen Wordfence Firewall Settings
Imagine if any of the user accounts on the website used a weak password or a guessable password from a dictionary. It would be easy for attackers to brute-force the password and take over the account.
This is one of the common attacks in WordPress, and you might continuously see the BruteForce attempts on your website.
2FA login security can prevent attacks to an extent, but how about non-2FA login accounts?
Let's go ahead and tighten the security for those accounts as well.
Enforce a Strong Password Policy
In the WordPress admin dashboard, navigate to "Wordfence", and select "All Options" from the left side menu.
The Wordfence "All Options" page will be loaded as displayed below.
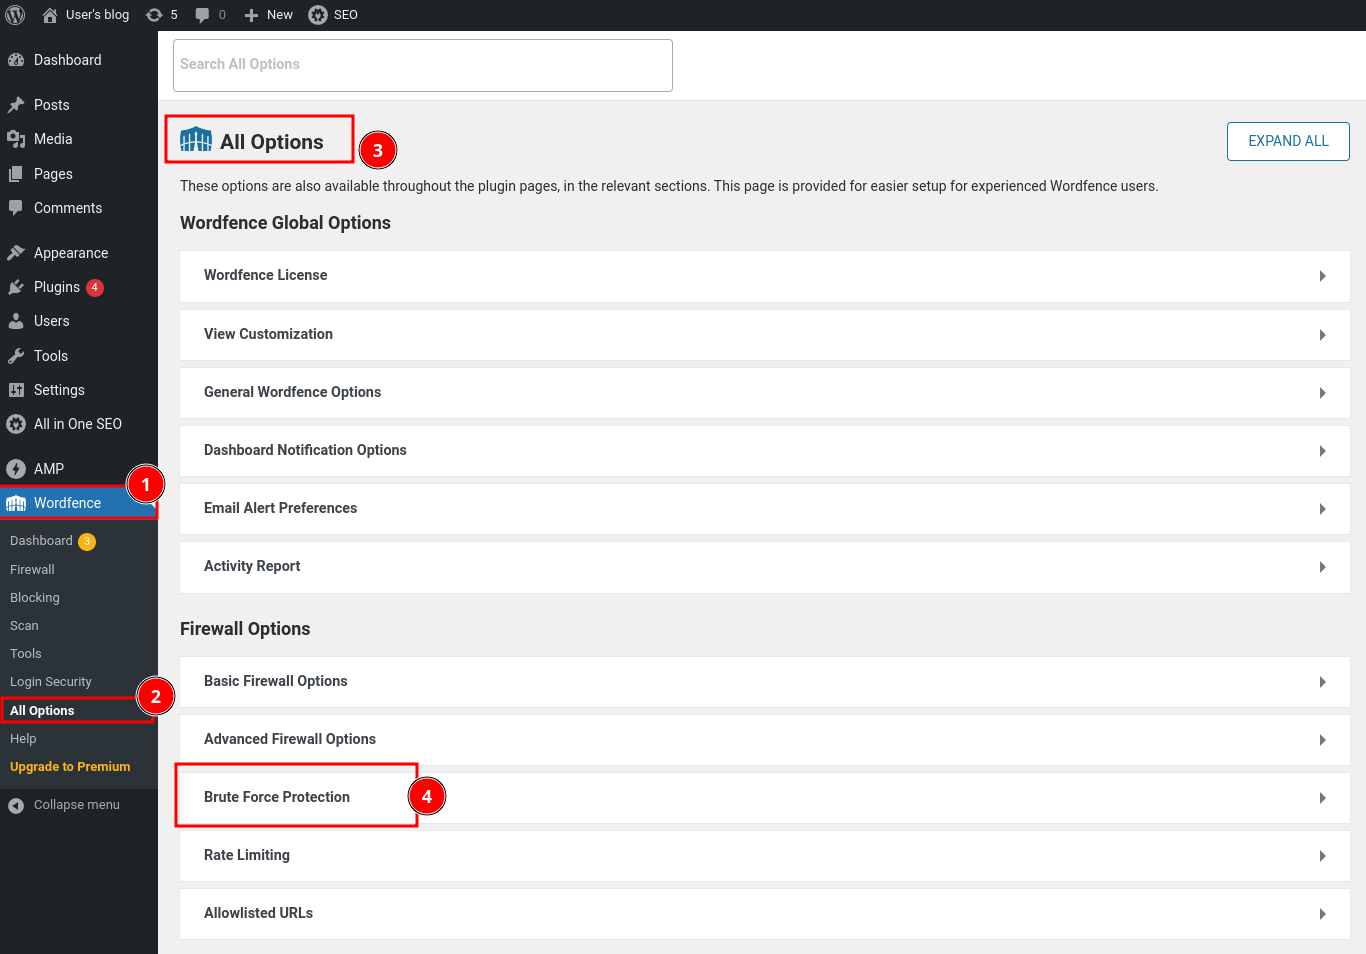
Click and Expand the "Brute Force Protection" section.
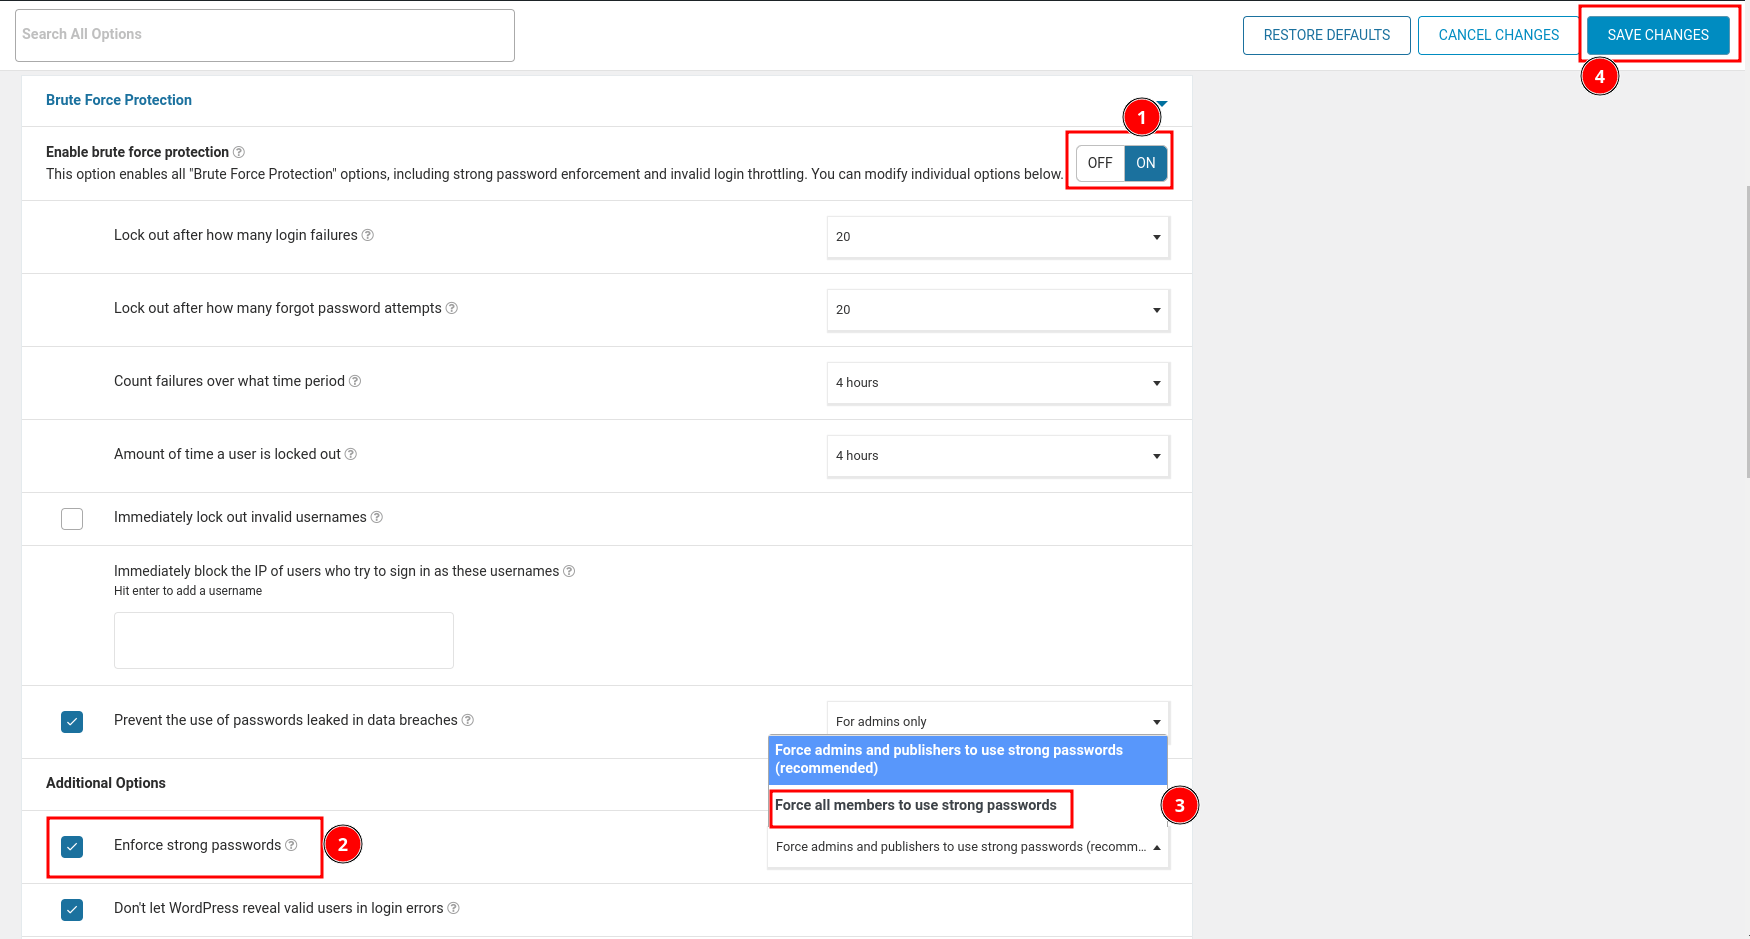
- Ensure the "Brute Force Protection" is enabled.
- Scroll down to the "Additional Options" section and ensure the "Enforce Strong passwords" option is checked.
- Set it to "Force all members to use strong passwords" from the dropdown menu.
- Make sure to click on "Save Changes".
These options would be enabled by default in Wordfence. It's good to verify. Going ahead, Wordfence will ensure that all user accounts are set with strong passwords.
Enforcing Account Lockout - Limiting Login Attempts
On the same page, we can even update the Account Lockout policy settings as well.
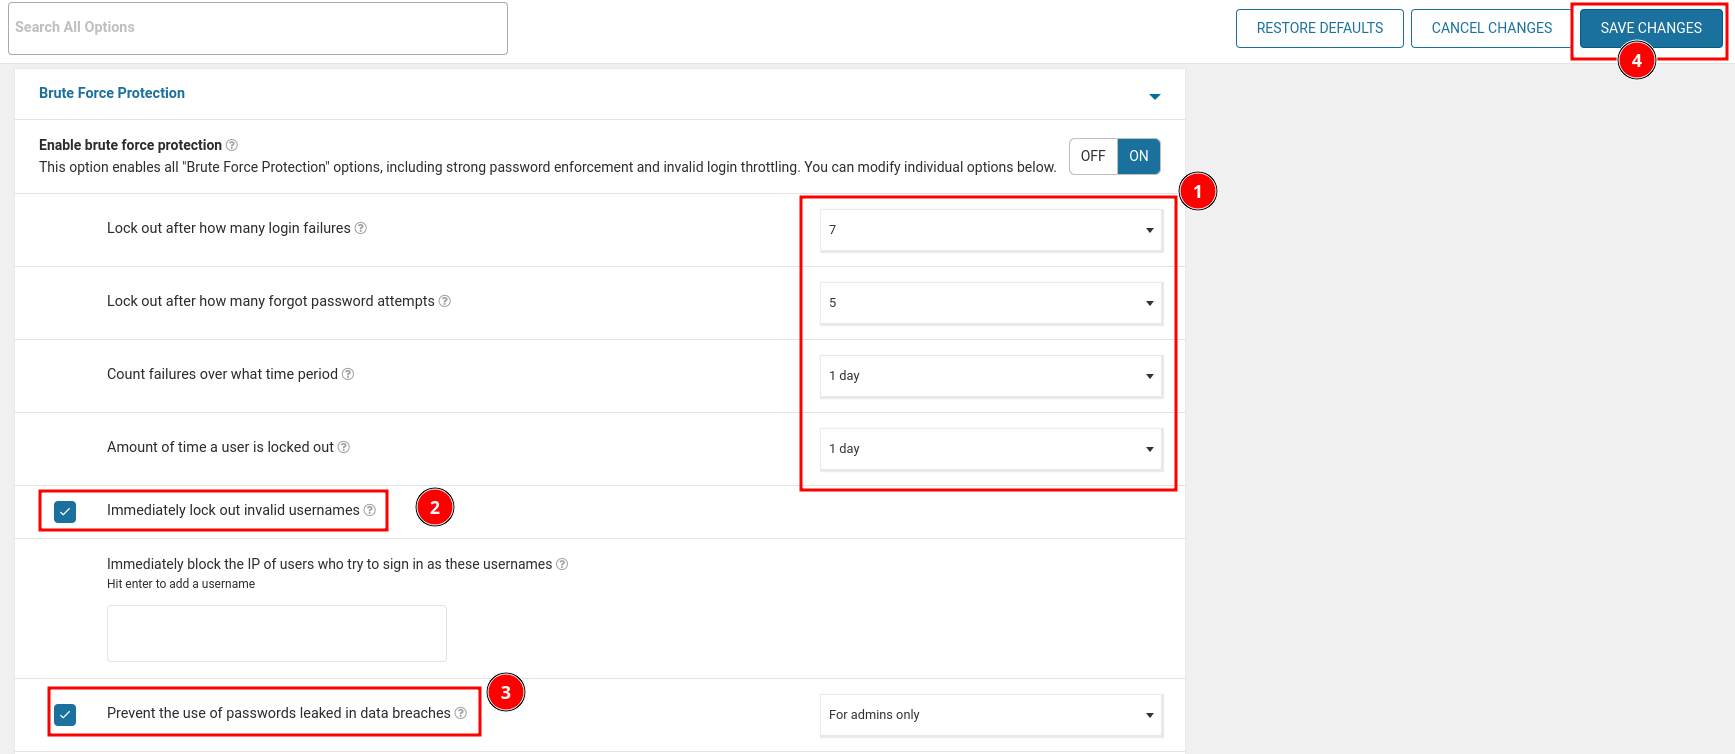
The Account Lockout settings provided by the default Wordfence are a good limit. You can proceed with it.
If your site is receiving a high number of brute force attacks, you can improve the lockout policy, as I have updated it on my website.
Additionally, I have selected the option to "Prevent the use of passwords from leaked in data breaches", which prevents the admin from using the leaked passwords.
Wordfence Firewall - IP Whitelist
To prevent yourself from locking out from the WordPress portal, it is good to whitelist your IP address.
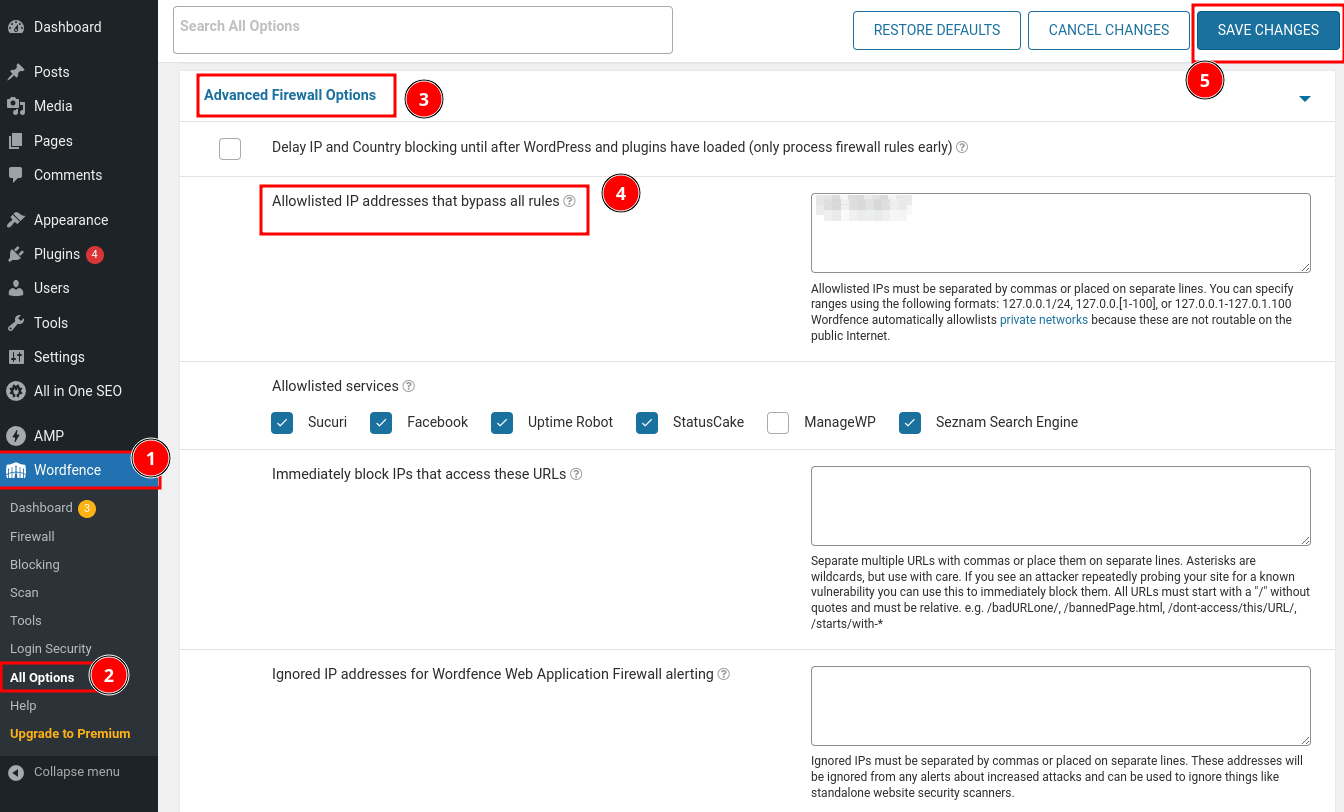
- Click on Wordfence in the WordPress admin dashboard.
- Select "All Options" to list all the Wordfence options available.
- The application loads the "All Options" page. Click and Expand "Advanced Firewall Options".
- In the Allowed IP address that bypass all rules, enter your Public IP address.
- Click on "Save Changes" to ensure the changes are persistent.
Using the above option, you can ensure that you are not locking out yourself. The same option can be used to whitelist the security audits as well.
Ensure Web Application Firewall Enabled
Using a firewall is one way to control what traffic must be allowed and what needs to be blocked from reaching your website. Web Application Firewalls (WAFs) can filter out suspicious traffic coming from the internet.
These WAFs are continuously updated with the patterns used by the attackers to compromise the website, which is called as rulesets.
This feature is also available in the Wordfence plugin. The free version of the Wordfence plugin will check and stop complex threats.
The Wordfence dashboard provides you with the information you need about firewall settings and alerts as well.
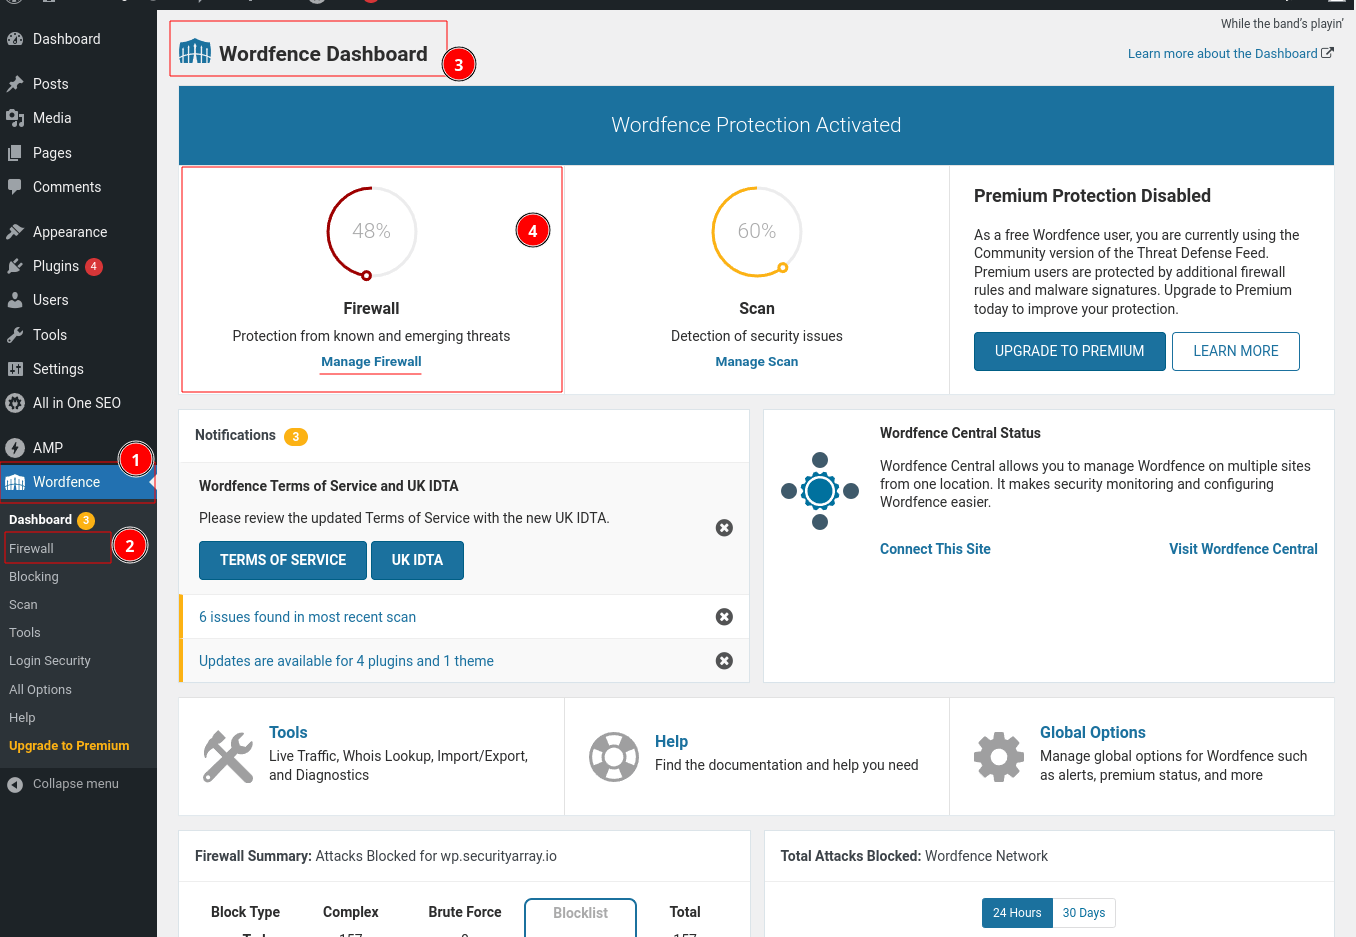
- Logging into the WordPress admin account, click on the "Wordfence" plugin on the left side.
- Click on the "Firewall" link on the left-side menu.
- The "Wordfence Dashboard" will be loaded as displayed in the above screenshot.
- Click on the "Manage Firewall" to check out all its settings and options.
The firewall options page will be loaded and displayed below.
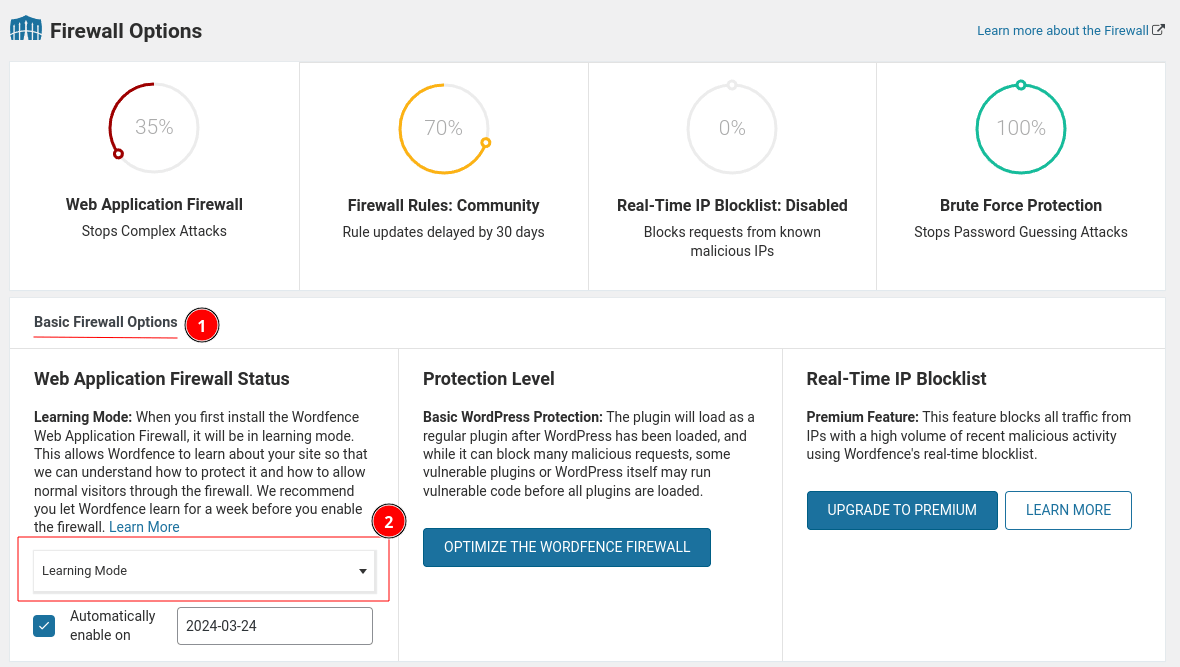
From the above screenshot, you can understand that the community edition (i.e. the free version) stops the complex attacks, and its ruleset updates are delayed for 30 days compared to premium editions.
- Click and expand the "Basic Firewall Options"
- When you set up the "Wordfence" plugin, it starts with a "Learning Mode". In this mode, it tries to understand your plugins and themes' working behaviour, like how they work and what is expected behaviour.
Post learning mode, it will automatically switch to "Enabled and Protecting" mode. You could also change it by clicking on the drop-down menu.
On the same page, click-expand on the "Advanced Firewall Options" and scroll down, you would be able to see firewall rules enabled on your website.
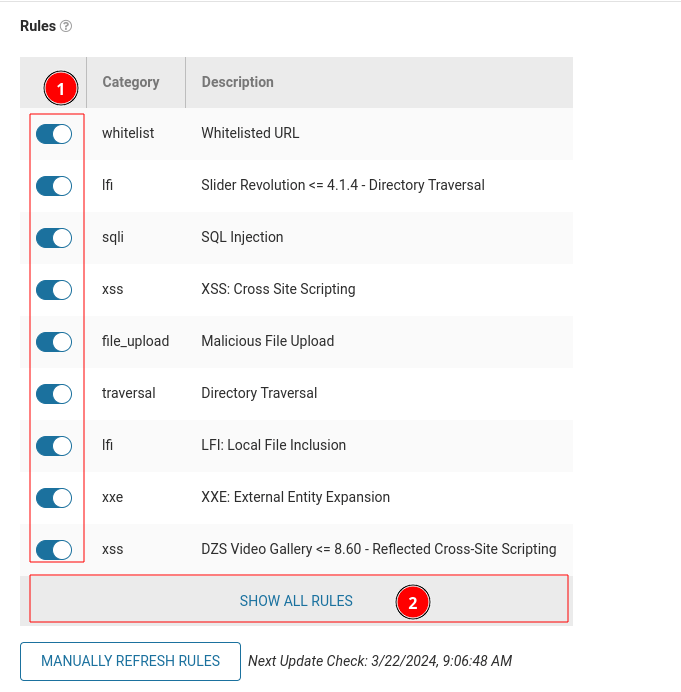
These are the rule sets that check for attack patterns for web application vulnerabilities like XSS, SQLI, File upload, XXE, etc.
If an attacker tries to exploit your website with an XSS vulnerability, the Firewall's XSS rule is triggered, and that particular attempt is blocked immediately.
Let's check the Wordfence Firewall in Action. I will just key in with a sample XSS payload, and let's see how it behaves.
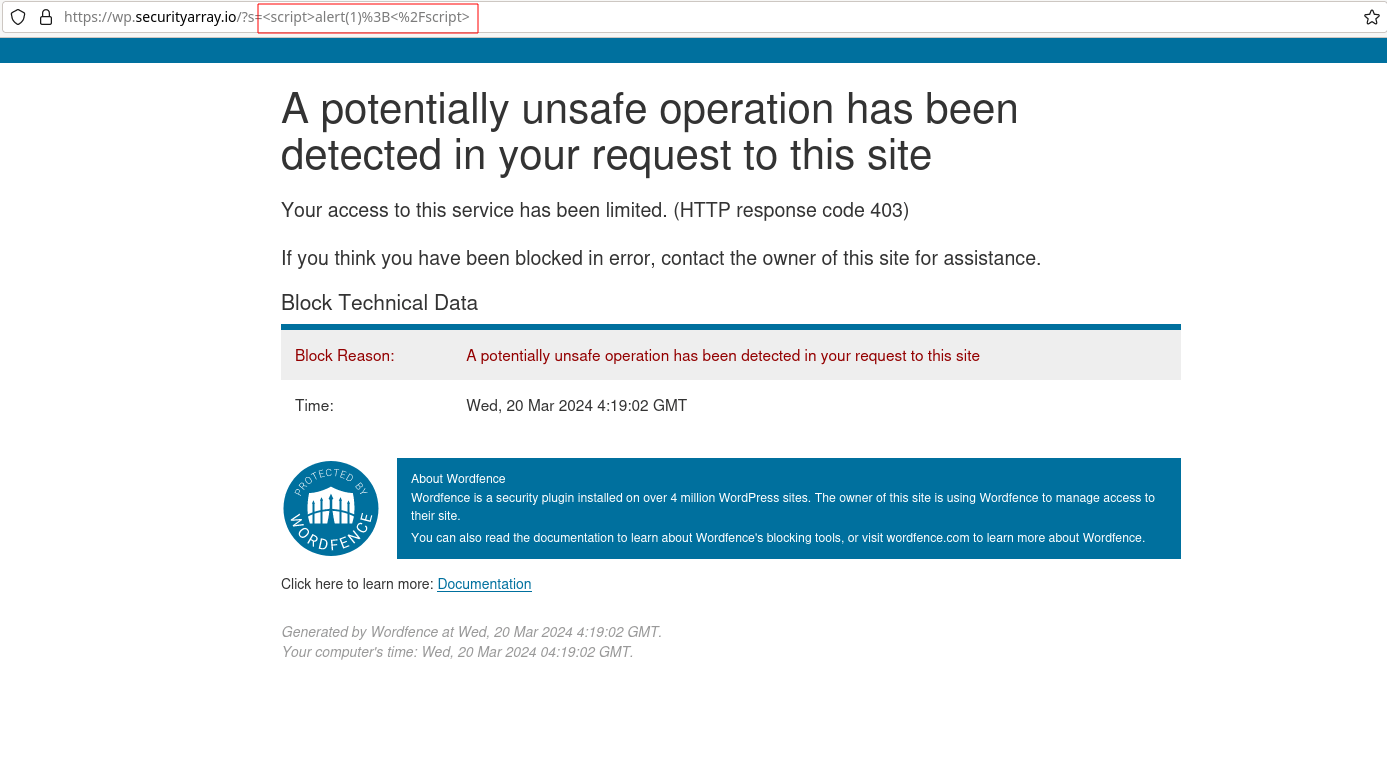
The above screenshot demonstrates that our firewall is active and blocking the XSS attempts with an HTTP response Forbidden 403 and a custom warning message from the Wordfence plugin.
If you have authorized any security professional to carry out the security assessment on your website, whitelist the IP address of authorized professionals and remove it when the assessment is complete.
I hope the above options can help you get started. At any point, you could opt for a premium service or seek professional assistance when needed.
Avoid Nulled WordPress Plugins or Themes
WordPress Nulled plugins or themes are modified versions of premium WordPress plugins distributed for free or at a negligible cost over the Internet through unofficial channels that anyone can download and use.
It might seem like a good deal to use without paying, but it does come with a few security risks. To learn more about it, check out the below bookmark.
https://securityarray.io/security-threats-of-nulled-wordpress-plugins-and-themes/
Wordfence Help
All the options I have covered above are good for helping you easily get started securing your WordPress website.

Wordfence Help
Using Cloudflare Web Application Firewall
Sometimes, the website owner would like to avoid having too many plugins for multiple reasons, such as slowdowns or maintenance reasons.
In this case, we could opt for a cloud-based web application firewall like Cloudflare WAF, Amazon WAF, etc. These cloud-based firewalls act as proxies, monitor traffic and filter out all malicious traffic before passing it to our Web Server. Since everything is done on the cloud, your server is not overloaded.
These cloud-based firewalls act as the first line of defence and filter out OWASP Top 10 Vulnerabilities, Bot Protection, Block DDOS attacks, and malicious behaviour before allowing traffic to your server. Cloudflare has free and premium plans. The rest are premium services.
For the demo, we shall get started using the free option that is available. Before proceeding, I would request you to check the following link, Adding a Site to Cloudflare, and ensure your website is added to Cloudflare.
Log into your Cloudflare account, navigate to your DNS settings and click on Records.
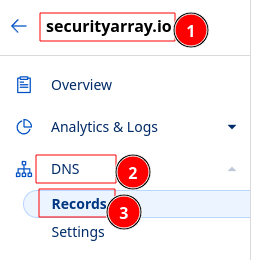
In your DNS records, look out for the one pointing to your WordPress website. In my case it "wp.securityarray.io".
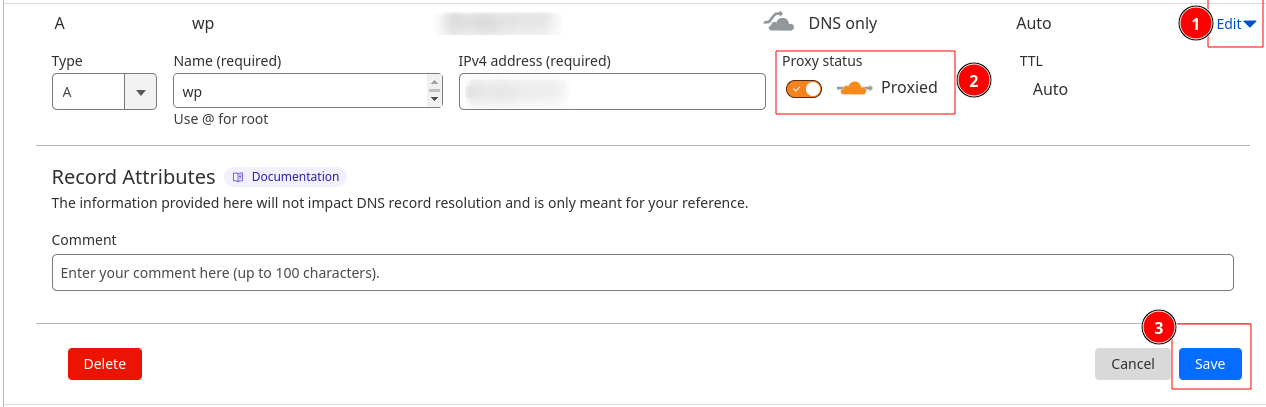
- Click "Edit" on your DNS record. i.e. for wp.securityarray.io
- Ensure the "Proxy Status" is enabled and all your incoming traffic is proxied through Cloudflare.
- Click on the "Save" button to make the changes.
The above configuration will ensure that all our traffic for "wp.securityarray.io" hits Cloudflare first and then reaches my server.

With the above, we have successfully been able to set up the basic WAF protection for our website.
As of today, a cheaper option for WordPress users is to use Cloudflare through Cloudways. Cloudways + Cloudflare are integrated and offer premium WAF capabilities at lower cost.
Scan for Vulnerabilities and Malware
Another important aspect of WordPress security is to scan your website for any known vulnerabilities and Malware at regular intervals.
Initially, would recommend installing and getting started with a Jetpack Protect plugin. I
The next steps would be to evaluate the different security plugins that are available in the market and choose the one that meets your requirements and needs.
Check out the bookmark below to learn more about the different ways to scan your WordPress website for vulnerabilities.
Raghunath GScan WordPress Site for Vulnerabilities
Install only reputable and trusted plugins. I recommend checking the plugins' reviews and support information before choosing one.
Monitoring and Responding to Security Threats
A good amount of context is covered in securing the WordPress website. Hardening the WordPress Site is not a one-time effort.
You would need to dedicate some time to monitoring it continuously, whether daily, weekly, or monthly, based on the severity of the data you are handling.
"Security is a process, not a product."
By: Bruce Schneier
Advantages of Monitoring
- Helps to keep your WebSite free from malware
- You know about the latest threats and keeping the WordPress core and plugins updated.
- Recognize the breaches early.
- You could also opt for updates through email notifications.
Wordfence Scan
A good amount of monitoring for security threats can be done with the help of the Wordfence plugin itself.
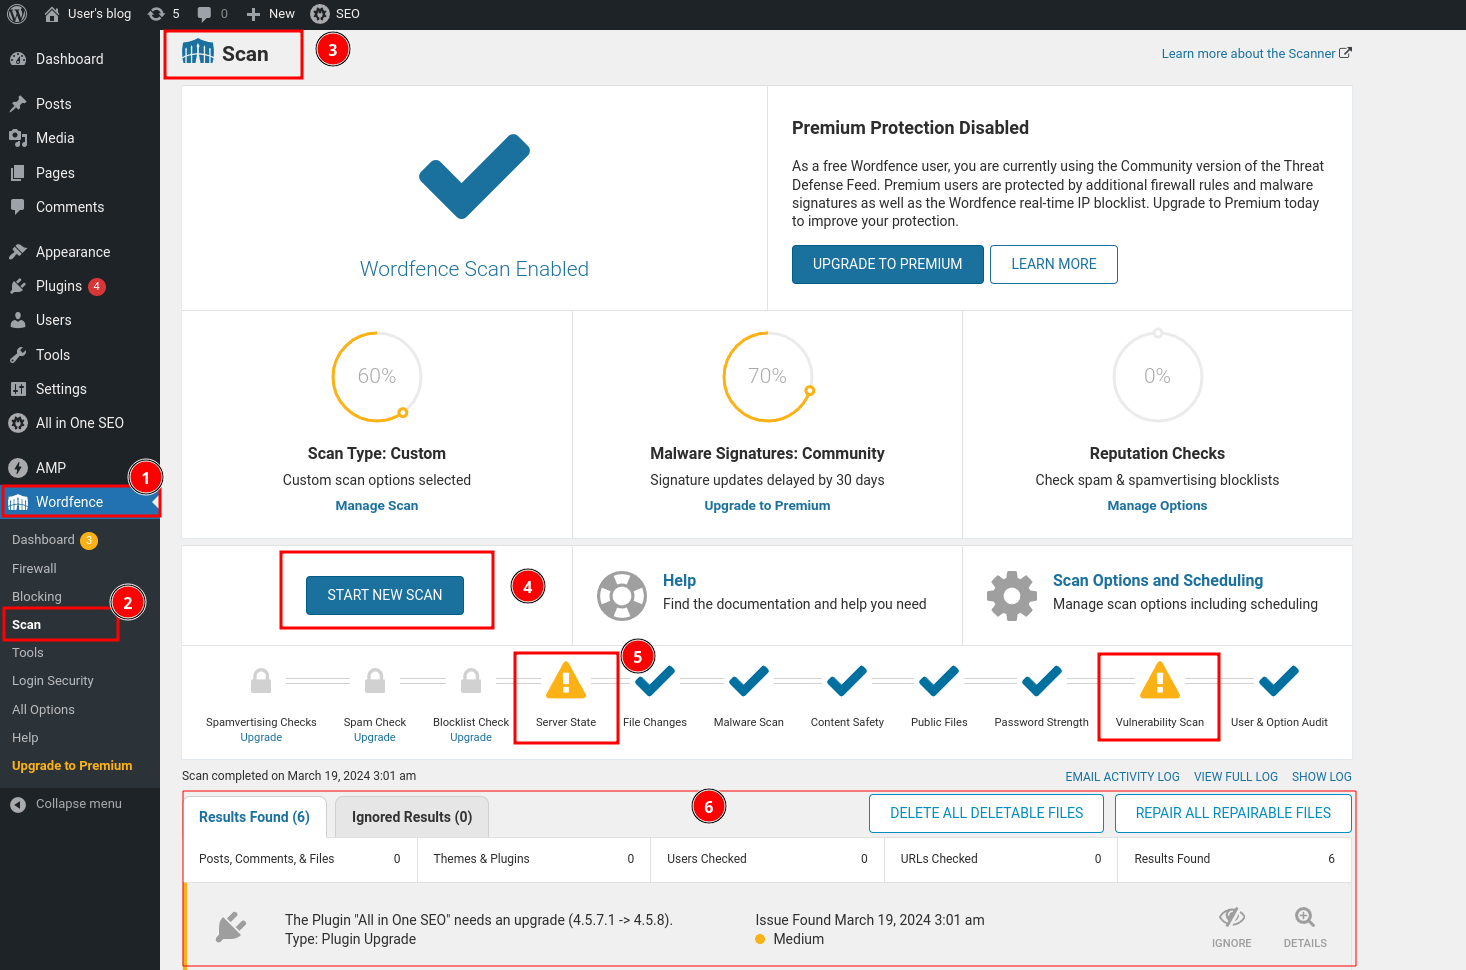
- In the WordPress admin dashboard, click and select "Wordfence"
- Click on the "Scan" link.
- The "Scan" section will loaded and displayed as shown above.
- You can start the scan by clicking on the "Start New Scan" button at any time on demand. It is generally scheduled to run every 24 hours. For more information, click on "Scan Options and Scheduling".
- Wordfence Scan will check for the Server State, File Changes, Malware Scan, Content Safety, Public Files, Password Strength, Vulnerability Scan, and User & Option Audit related files. Additionally, it will display warnings if any are found on your website.
- Results information will be displayed.
Just double-click on the result item or click on the details button on the result. It will provide you with more information.
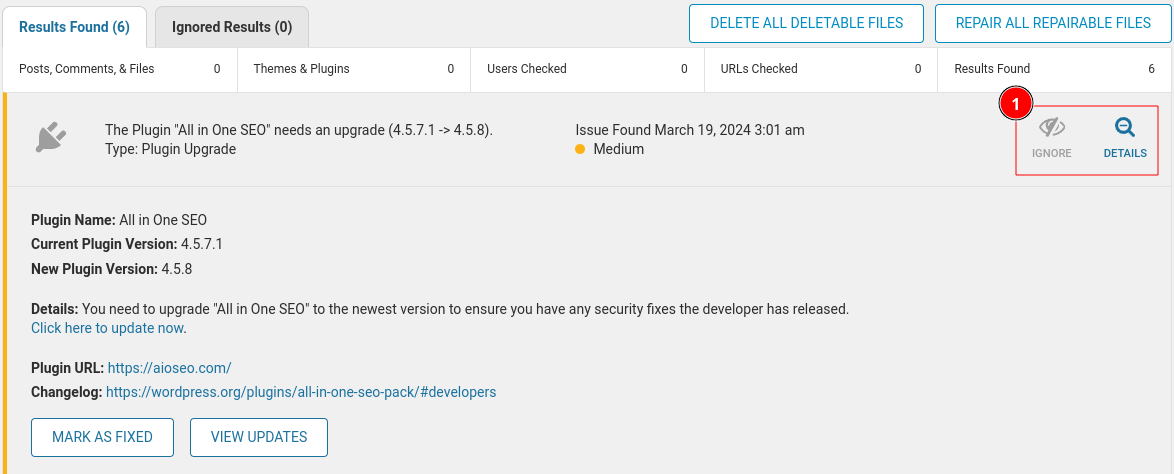
For each result, you can understand the problem and how to address it. If you think any of the result is "Fase Positive", you can click on the Ignore button.
Performing all the above actions can help you reduce attacks and secure the website to a good extent. You can always seek professional services if additional needs arise.
Troubleshooting
My Website becomes slow when using Wordfence
This is one of the performance impacts that can be witnessed on some of the WordPress websites. One option is to set "Low resource scanning".
To do this, Navigate to "Wordfence" -> "Scan" -> Scanner Options and Scheduling -> Performance Option -> Ensure "Use low resource scanning (reduces server load by lengthening the scan duration)" is enabled and check.
Another option could be to use premium solutions like Sucuri or check Cloudflare WAF solutions.
I think my website has been Hacked.
Try using a couple of options, like cleaning and reinstalling all the latest versions of the plugins. Scan with malware analysis plugins like Wordfence, Sucuri, etc. If the issue persists, seek professional assistance.
Conclusion
In conclusion, website security is of utmost importance, especially for WordPress website owners. With the increasing number of cyber threats, it's crucial to take proactive measures to protect your online assets.
Wordfence is a security plugin that is freely available for WordPress and provides a wide range of features to enhance your website's security. Free plugins always come with limitations. It is good to get started, but when demand increases, you might need to opt for premium options with dedicated support.
By following the steps outlined in this guide, you can configure Wordfence and its settings to keep your website safe from potential threats such as malware, brute force attacks, and more.
Additionally, keep monitoring the WordPress security news and take action accordingly. Don't wait until it's too late – take the necessary steps to secure your website today.
Additional Checklists and References:


WordPress Security Releases
 WordPress.com / Automattic Inc.
JetPack WordPress Security Checklist

WPScan WordPress Security Checklist
 Owais Khan
Cloudways WordPress Security Checklist